Showing posts with label costuming. Show all posts

Tuesday, September 27, 2022

Finally wearing my (white)work

While stuck at home in 2020, I had a hard time transitioning to being on the computer so much when my job had previously involved a lot of human interaction. (Meetings, I mean meetings.) To help myself focus, I turned back to an old trick I used to keep my mind and hands occupied while in college: embroidery. I would plan projects and practice stitches at night, and then work my way through the project during endless zoom calls.

I started with a crewel pocket, because I felt more familiar with the stiches and it gave me a chance to try a bunch of different things.

photo of the finished pocket on natural undyed cotton with colorful flowers, vines, and blue birds embroidered on it
also, birds!

After that, I decided to try something different and ended up settling on whitework. Traditional whitework includes a variety of different styles and techniques, all executed in white thread on white fabric. I've always loved white on white embroidery - I made some truly disastrous attempts at applying it to corsets back in the day - so lockdown seemed like a fine opportunity to really take my time and learn. For that task I turned to the excellent books and online materials from the Royal School of Needlework: for this project I referenced Whitework RSN Essential Stitches Guide by Lizzie Lansberry as well as the RSN's online stitch bank

As a first project, I decided to make a mid-19th century collar. Separate collars and cuffs were common throughout the 19th century as they could be tacked on to different items and removed for cleaning. It's one of those little bits that makes an ensemble feel really lived-in...and also something I've been sadly lacking for my daywear. So a practical, small thing I could actually wear and wouldn't be too big to bite off seemed ideal!

I settled on this collar from Godey's Lady's Book September 1856:

page from godey's with an image of the collar to be traced and instructions above it
embroidered collar with grapes and leaves, via

I started by tracing the original source pattern from my computer screen onto a sheet of paper with pencil, and then went over it with sharpie to create a pattern I could save and re-use. Next I traced that pattern onto a scrap of lightweight cotton using a water-soluble embroidery pen. Then I got to stitching!

a picture of the collar in progress, with the blue pen tracing visible and some white stitching in place

The vines are stem stitch, and the grapes are eyelets, and the leaves are outlined in backstitch. The instructions accompanying the pattern in Godey's say to fill in the leaves with backstitch but I decided I liked the look of the leaves better with just the outline, so that was what I did. (I intentionally started at the back of the collar, so all my initial awkwardness and mistakes aren't super noticeable.)

Once the collar was done I cut it out, hemmed the neck edge using a rolled hem stitch, soaked it to remove the embroidery pen, and ironed it over a towel. And then it was done! But given this was Spring of 2020, once it was done...nothing really happened. I think I posted a photo on Instagram, and that was that.

the author in a purple printed 1860s dress and gray felt hat standing in a field

Fast forward two years, and I have finally worn this collar out into the world! As would have been done in the period I tacked the collar into the bodice of my purple reproduction print 1860s day bodice, which closes in front. (And which I have been wearing since 2013! and still have. not. trimmed. Seriously, this is next...)

I didn't exactly get it on center, but aside from that I am immensely pleased that this little piece has made it out into the world (or at least as far as CT!), and that it made the dress feel complete. Now I want to make more collars! For now, here are (finally!) some pictures documenting the fact that yes, I made a thing, and even better, I wore it out.

the author from the shoulder up standing in a garden wearing a printed bodice and white embroidered collar

the same printed bodice and collar in close up, so the stitching is visible

another close-up shot of the collar, this time from the back

So three cheers for perfect fall weather, having the wardrobe to just bop off to a historical site in the right clothes (and right layers for the temperature) when invited, and friends who take a million photos so you get one where your face isn't doing a weird thing.

the author and friend smiling into a mirror inside a historic house

(And in case you're wondering: I am still embroidering on and off! But I don't have much to show for it yet, as I started a pretty big project after this and I've got about a third left to go. Stay tuned!)

Saturday, August 6, 2022

Winter Garments at Midsummer

In my recent recounting of the February expedition to Nestlenook, I mentioned that I wore a mix of old and new items. Even though we ended up planning the trip last minute and I didn't have a ton of time, I'd been thinking about skating clothes for years and was inspired to try and knock some garments out. And I did!

Though I do have a warm winter 1870s outfit (which I've worn on previous excursions), I wanted to do something with a more explicit skating theme, similar to these images:

Balmoral skirt advertisement, 1860s (via)

Jan. 1860 Harper's Weekly illustration of skating in Central Park, NYC (via)

Advert for a skating park in Philedelphia, circa 1860s (via)

Illustration of a lady ice skating with a support structure, 1867 (via)

The key elements that stuck with me when looking for inspiration were layers, gathered/bustled-up skirts exposing petticoats (but everything hitting above the ankle, where it would be out of the way for skating), and fur or knit trim on the coat or bodice. Also, all of my inspiration was 1860s...which makes sense, as I've spend a lot of time thinking about 1860s ice skating in particular while reading period letters over the years. So a vaguely 1860s ensemble it would be!

I thought I could get away with using the fur-trimmed bodice from my 1870s ensemble, worn with only the underskirt (looped up all the way around) if I added a contrasting petticoat underneath. Originally I planned to wear hoops as well, but when I decided to attempt throwing together a quilted petticoat I decided hoops didn't make sense.

Quilted petticoat c.1850-1875 (via)

Quilted petticoats were a common winter layer in the 18th and 19th centuries - while the style changed to support the popular silhouettes of particular decades, the basic premise remained the same. A skirt of wool, silk, or cotton was quilted over an inner layer of batting to provide warmth and insulation. Essentially, it's a wearable blanket. As an eternally cold human, I really wish these were still in fashion! If you poke around online, it's easy to find beautiful examples of quilted petticoats with all kinds of intricate quilting designs in addition to more utilitarian diamonds/straight lines. And while I really love the way they look, I just do not have the patience to hand quilt a piece this large. (See: the embroidered canezou I've been working on in fits and spurts since 2020.) But I wanted to be warm, and was interested in figuring out if I could do that historically, so I went for historical results and decidedly modern methods.

a bed with a light blue quilt spread out on it, and a cat sleeping in the middle of it

I found a lightweight cotton quilt with a pretty floral stitch pattern second hand that seemed like a perfect petticoat candidate. After a washing ("assisted" by a fluffy demon), I measured out the height I would need and cut the quilt down - I am in fact much shorter than a queen-sized bed. Then it was time to seam rip...and seam rip...and seam rip. I ripped all of the quilt stitching and cut the batting out of my "seam allowance" at each side where I would sew the quilt into a tube and at the top to give myself a lighter, unquilted section at the top of my hips (something I'd seen on originals). Then the quilt became a tube, and the tube became a skirt by attaching a deep cotton section to the top (so that the quilt started at my hips, rather than my waist).

That was as far as I got by trip day...as usual. I ended up throwing sewing materials into the car, and pleating the petticoat to the waistband on my friend's floor before we left. Then the waistband was added in the parlor of the inn where we stayed (with both of us sewing because I am slow). Onto my body it went, along with modern fleece leggings, tall historical wool stockings, a chemise, a corset, a modern thermal long underwear shirt (which I think is a not inaccurate as a layer), boots, and the "witch winter" velvet bodice and skirt. Layers don't have to be thick to keep you warm!

the author from the back, in motion ice skating
still perfectly mobile

I ended up borrowing a muff from a friend because I forgot mine at home, and I did put modern foot warmers in my boots after the sleigh (I have bad circulation and my toes were entirely numb). But aside from that, I was warm enough to survive an open sleigh ride! Which given we were sitting for a long time felt like a big achievement - ice skating, while incredibly fun, is pretty active so it's easier to be toasty.

The author carefully stepping out of a sleigh in the snow

The quilted petticoat provided a somewhat full shape, but isn't distinctly 1860s - since I think it's likely people in the 19th century continued to wear these kinds of practical garments for activities where fashion was less important, I'm ok with that. Overall, my approach of mish-mashing together items I already owned with new, stylish accessories felt like a very natural sort of way of ending up in an outfit. To me that's the difference between a "look" (as we might say in 2022) and real, lived-in clothes. So it works for me, even if I wasn't the most fashionably wide skater on the pond! 

(Although I probably was the widest skater on the pond...details. *waves hand*)

Speaking of fashionable accessories: I did make on of those as well. I knew I wanted to cover my head because that is a really solid approach to staying warm, and just as I was starting to think about how I would do so Vivien at Fresh Frippery posted a lovely convertible hood tutorial. Using her measurements as a guide, I was able to pull some checked brown wool and fur trim from the stash to put together a reasonable mid-century winter hood. And with the falling snow, I was so glad I had it!

an 1860s Harper's Bazaar page showing winter styles

making a silly face while testing fit 

also a fan of the rabbit fur trim

Altogether, I was immensely pleased with the ensemble!

the author standing on the ice with snow behind her in the skating outfit

Fast forward to late July...

I made it through a day of sleighs and skating and general snow shenanigans in my quilted petticoat. It was wearable! But it was not my finest work. When we got home, it went to the UFO pile to be fixed before it was put away...and remained there until last week, when I was inspired to write this post and wanted to finish the petticoat for real before blogging about it. 

a dress form with the blue quilted petticoat being worn, showing the messy and uneven pleats at the waistband
the rushed and highly uneven waist as I wore it in February

a bright blue section of the petticoat spread over an ironing board
Waistband removed, stitches picked, getting ironed for round two (plus a Drag Race cameo)

 I went back and removed the waistband and pulled out the pleats. After ironing everything, I measured and put in (more) evenly-spaced pleats. I even added closures! So now this is officially done and ready to be worn again.

the same sewing dummy wearing the quilted petticoat, which now has smooth and even pleats

a close-up of the back of the petticoat showing two hooks for closure
closures!

And as a final fun fact (and ultra-throwback): in the spirit of trying to minimize how many new materials I buy, I was able to make both the hood and the petticoat using stash materials (minus the quilt itself, which I bought). The bright blue cotton at the top of the petticoat was left over from a 1950s prom dress I made way back in 2014! That means this cotton remnant has been with me through 3 moves - oi vey. I'm very glad I was able to find a great use for it, even if it won't be seen when the petticoat is worn.

Saturday, May 8, 2021

The Return of Witch Winter: A Journey to Bancroft's Castle

At the moment I'm sitting on the floor of a hotel room trying to coax my cat to come out from under the radiator...so I figured I would entertain myself (and hopefully all of you) with a sequel to a 2019 undertaking. (Thus the very extra title. I am amused at least!)

A pact, some magically perfect weather, and the ruins of a stone castle hunting lodge - definitely the tagline to a movie right? 

the author in her finished ensemble among stone walls and snow

Not a movie, but a very good adventure, which is better I think.

the author and friend in bustle ensembles trekking through a snowy forest


The prologue:

Several years ago, a friend made a Hufflepuff bustle ballgown, and as I was doing research to make my own 1870s ballgown I started noticing green dresses with gray trim popping up quite frequently in fashion plates. As a Slytherin I'm partial to this combo anyways, and with Emma's dress on the brain I decided I wanted my own house bustle dress. But I also got my heart stuck on doing a velvet and fur ensemble, which....doesn't really lend itself to a ballgown. So instead I abandoned the ballgown idea, and decided that I would make a winter dress at a later time. 

That time became winter 2019, (aka "witch winter" because I was also on a bit of a witch-based novel kick at the time). I finished the project in March, which was too late to go skating or have enough snow for good photos. Then late 2019 into early 2020 was insanely busy and I was travelling, and I didn't have time to do a photoshoot. And by the time I was grounded, the snow was gone again.


Cue the pact. Quinn at The Quintessential Clothes Pen had also recently completed a wintery bustle ensemble, and needed photos as well. So with lockdown keeping our weekends very free, we vowed that the next weekend when there was good snow for photos, we would do a photoshoot. We actually scouted locations in advance (it was nice to get out and do some hiking), so we knew exactly where we wanted to go: Bancroft's Castle, a 20th century estate-turned sanitarium-turned hunting lodge that burned down in 1932 and is now public land. (And an off-topic fun fact: if you hike up to the castle and look out over Gibbet Hill, it may look familiar...because it was one of the filming locations in the 2019 Little Women movie.)

the author wearing a green velvet 170s bustle with fur trim and a gray hat in a ruined stone tower

The Adventure:

During the week it snowed, and Saturday dawned crisp and clear. It was a perfect New England winter day, with bright sun and low temperatures, and I was totally warm! Between the cotton velvet, flannel interlining, and silk lining, I was plenty toasty. The only cold part of me was my hands, but I have notoriously bad circulation and that happens in modern clothing too.

(I did cheat and wear modern snow boots, because we were hiking up a hill and I honestly didn't want to get my historical shoes dirty.)

This was essentially the first outing for this outfit, and it was so fun to get to finally wear it!

posing under a large stone archway

on the second level with another archway and the large fireplace and chimney in the background

We had a lot of fun playing with the angles of the archways and the modern wrought iron railings. With the weather so cold, we had the place to ourselves which was lucky but perhaps not surprising.

I also got to put the pockets in the underskirt to good use - they were great places to stash a cell phone, lens cap, and mask.

portrait shot of the author in a tower window, showing the gray hat and braided hairstyle in detail

My hair was a bit of an undertaking, but I'm happy with the way it came out! Since my hair is naturally very curly, I can usually tuck the ends around false braids to make them blend in. But I dyed my hair purple this year! From the front, you can't tell and everything blends - from the back it's a little more obvious what's actually my hair and what's not. Oops. 

full length in profile, where the purple hair is visible at the back of my head

from the back, showing the circled braid and curls in the center

The hat is a very old purchase from a sutler at a reenactment when I was in high school or just after. Since it doesn't work for most of the periods I do, it's been languishing in my closet and I was pleased it fit so well with this project!

a repeat of the earlier image showing the second level stonework with a slightly different angle

Now I just need to finish the cape I was making to go with this...I suppose that's an excuse for a trilogy. Maybe by next winter!


Friday, April 17, 2020

Breakfast Cap for a Bride, 1860s

I have an ongoing fascination with caps. I think they're absurd. Also, I kind of love them?

Usually my focus is on Regency caps, because the only reliable daytime event I go to these days is the tea at our annual Regency dance weekend. But every now and then I come across a later period cap, and I tuck it away. While I was working on my 1860s morning dress, I came across a particular description for a breakfast cap that seemed serendipitous:
Godey's Lady's Book, December 1861 (via)
"NOVELTIES FOR DECEMBER...Breakfast-cap for a bride (a fashion becoming more and more universal since breakfast caps are now made extremely piquant and becoming). Material spotted thulle [sic], trimmed with roses and rose de chine ribbon."

I think a combination of being newly married myself and finding spotted tulle while at the craft store for something wholly unrelated lead me to decide that I needed a breakfast cap to go with my morning dress. I ended up taking inspiration from the description above and the general shape of these two extant caps from the period.

Black net cap
black net cap, French, from the MFA Boston
1863 Godey's. "Breakfast caps. 1. ...of French muslin trimmed with violet ribbons. 2. ...in the form of a net trimmed all round with a double row of blonde; two ribbon streamers behind. Three roses make a pretty bandeau to the front of the cap. Black or white net may be used for the purpose, and whatever colored ribbon best suits the complexion of the wearer." [jrb]
breakfast caps, from Godey's 1863
And then I made it up. I knew I needed a structure of some kind, so I ended up using black velvet ribbon to make a base shape. Then a gathered a circle of spotted tulle to the ribbon, and trimmed the hell out of it.

Ribbon base

completed cap
I did depart from the description on the colors: mine is trimmed in blue silk ribbon and purple flowers rather than roses and pink ribbon, but both the ribbons and flowers came to my stash from wedding gifts. So I feel like that doubles down a bit on the "bride"-iness of the cap and it makes me happy! 

cap, hair, and dress
In the end, I should have pinned this in a bit better. It slid back from the center of my scalp where I had intended it to sit. Also, by the time this picture was taken my loosely styled hair was falling pretty considerably. But even so, I'm really pleased with this first foray into caps! It's absurd, which is just the way I like it.

Sunday, April 12, 2020

A Dress for Staying Home: 1860s Morning Robe

Back in December, I bought two lovely reproduction print cottons on a Little Women movie high. Printed cotton always feels very appropriate to me for New England, as between 1810 and about 1840 the Massachusetts textile industry was one of the largest in the country (and is where the power loom was invented). The Waltham-Lowell system of fabric production introduced two major ideas to fabric production: 1) going from raw material to a finished product (fabric) with all processes happening within the same factory building, cutting down on transportation and logistics; and 2) primarily employing single young women. These factors helped to shape the production of cloth in America for much of the early 19th century, and helped give the group of mill owning families known as "the Boston Associates" significant financial clout. The textile industry shaped the state as I know it today: 45 mill towns were established in MA in the first half of the century, and the mill owners also invested in the establishment of railroads and water power sites.

The Mill Girls of Lowell - Lowell National Historical Park (U.S. ...
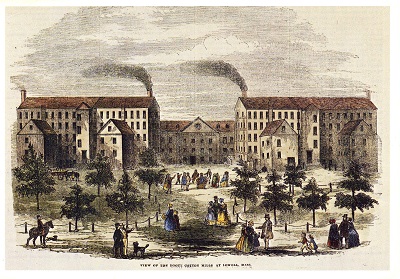
period illustration of a mill campus in Lowell, MA

Of course, during the 1860s new cotton fabric would be difficult to come by--the economies of the North and South were closely linked through cotton textile production, and so the Confederacy placed an embargo on raw cotton. With a lack of raw materials or employees (as many mill workers, known as "mill girls," volunteered as nurses or went home to fill in for men who had joined the army), many mills shut down until after the war. But there are so many mid-century cotton dresses, I think the association has stuck for me.

Boott Mills, Lowell (now apartments)
But you came here for the clothes! So back to that fabric order...I ordered 2 prints, one dated c. 1860 and the other dated 1830-1845. The 1860 print seemed perfect of a very particular impression-inspired dress, but I had didn't really have a vision for the earlier print. I just really liked it when I saw it on the store website. Xena approved as well.


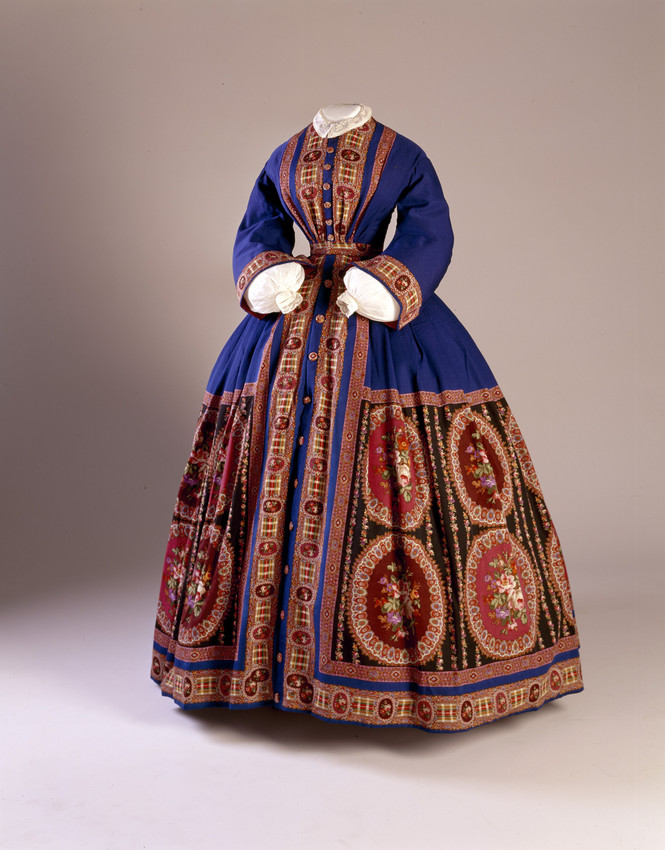
At some point over the next few months while I was busy with other projects, this fabric started to tell me that it wanted to be a morning dress. I spent some time looking at extant morning dresses and fashion plates, and started to get some ideas--specifically, many of the originals I liked were trimmed with quilted silk, and I happened to have some in the stash!

The term "morning dress" referred to relatively simple dresses that closed in front, and were intended for wear around the house. Several styles appear in magazines, including a sack coat and matching skirt, a fitted dress with no waist seam, and a dress belted to define the waist (with or without an actual waist seam separating the bodice and skirt). Two notes I found interesting while looking at issues of Peterson's and Godey's Lady's Book for this project were that morning dresses intended for interior wear (as opposed to walking dresses or morning walking dresses) were noted as often trimmed with velvet, embroidery, or quilted silk; and that apparently in France morning petticoats were more expensive than morning dresses, because they were so finely trimmed or embroidered. This actually makes sense, as many morning dresses are open in front, revealing the petticoat.

Peterson's Magazine September 1863 blue wrapper.
Morning dress, 1863, with embroidered, tucked, and ruffled petticoat visible in front (from Peterson's Magazine)
Extant morning gown, wool, c.1860-1864 (Historic New England)
Printed wool morning robe with quilted silk trim and patch pockets, 1860s (Augusta Auctions)

You can see my Pinterest board for this project here, but in general here were the elements I decided I wanted to incorporate:
-button up bodice
-full sleeves with cuffs that open to undersleeves
-quilted silk trim
-a patch pocket
-a belt with a bow

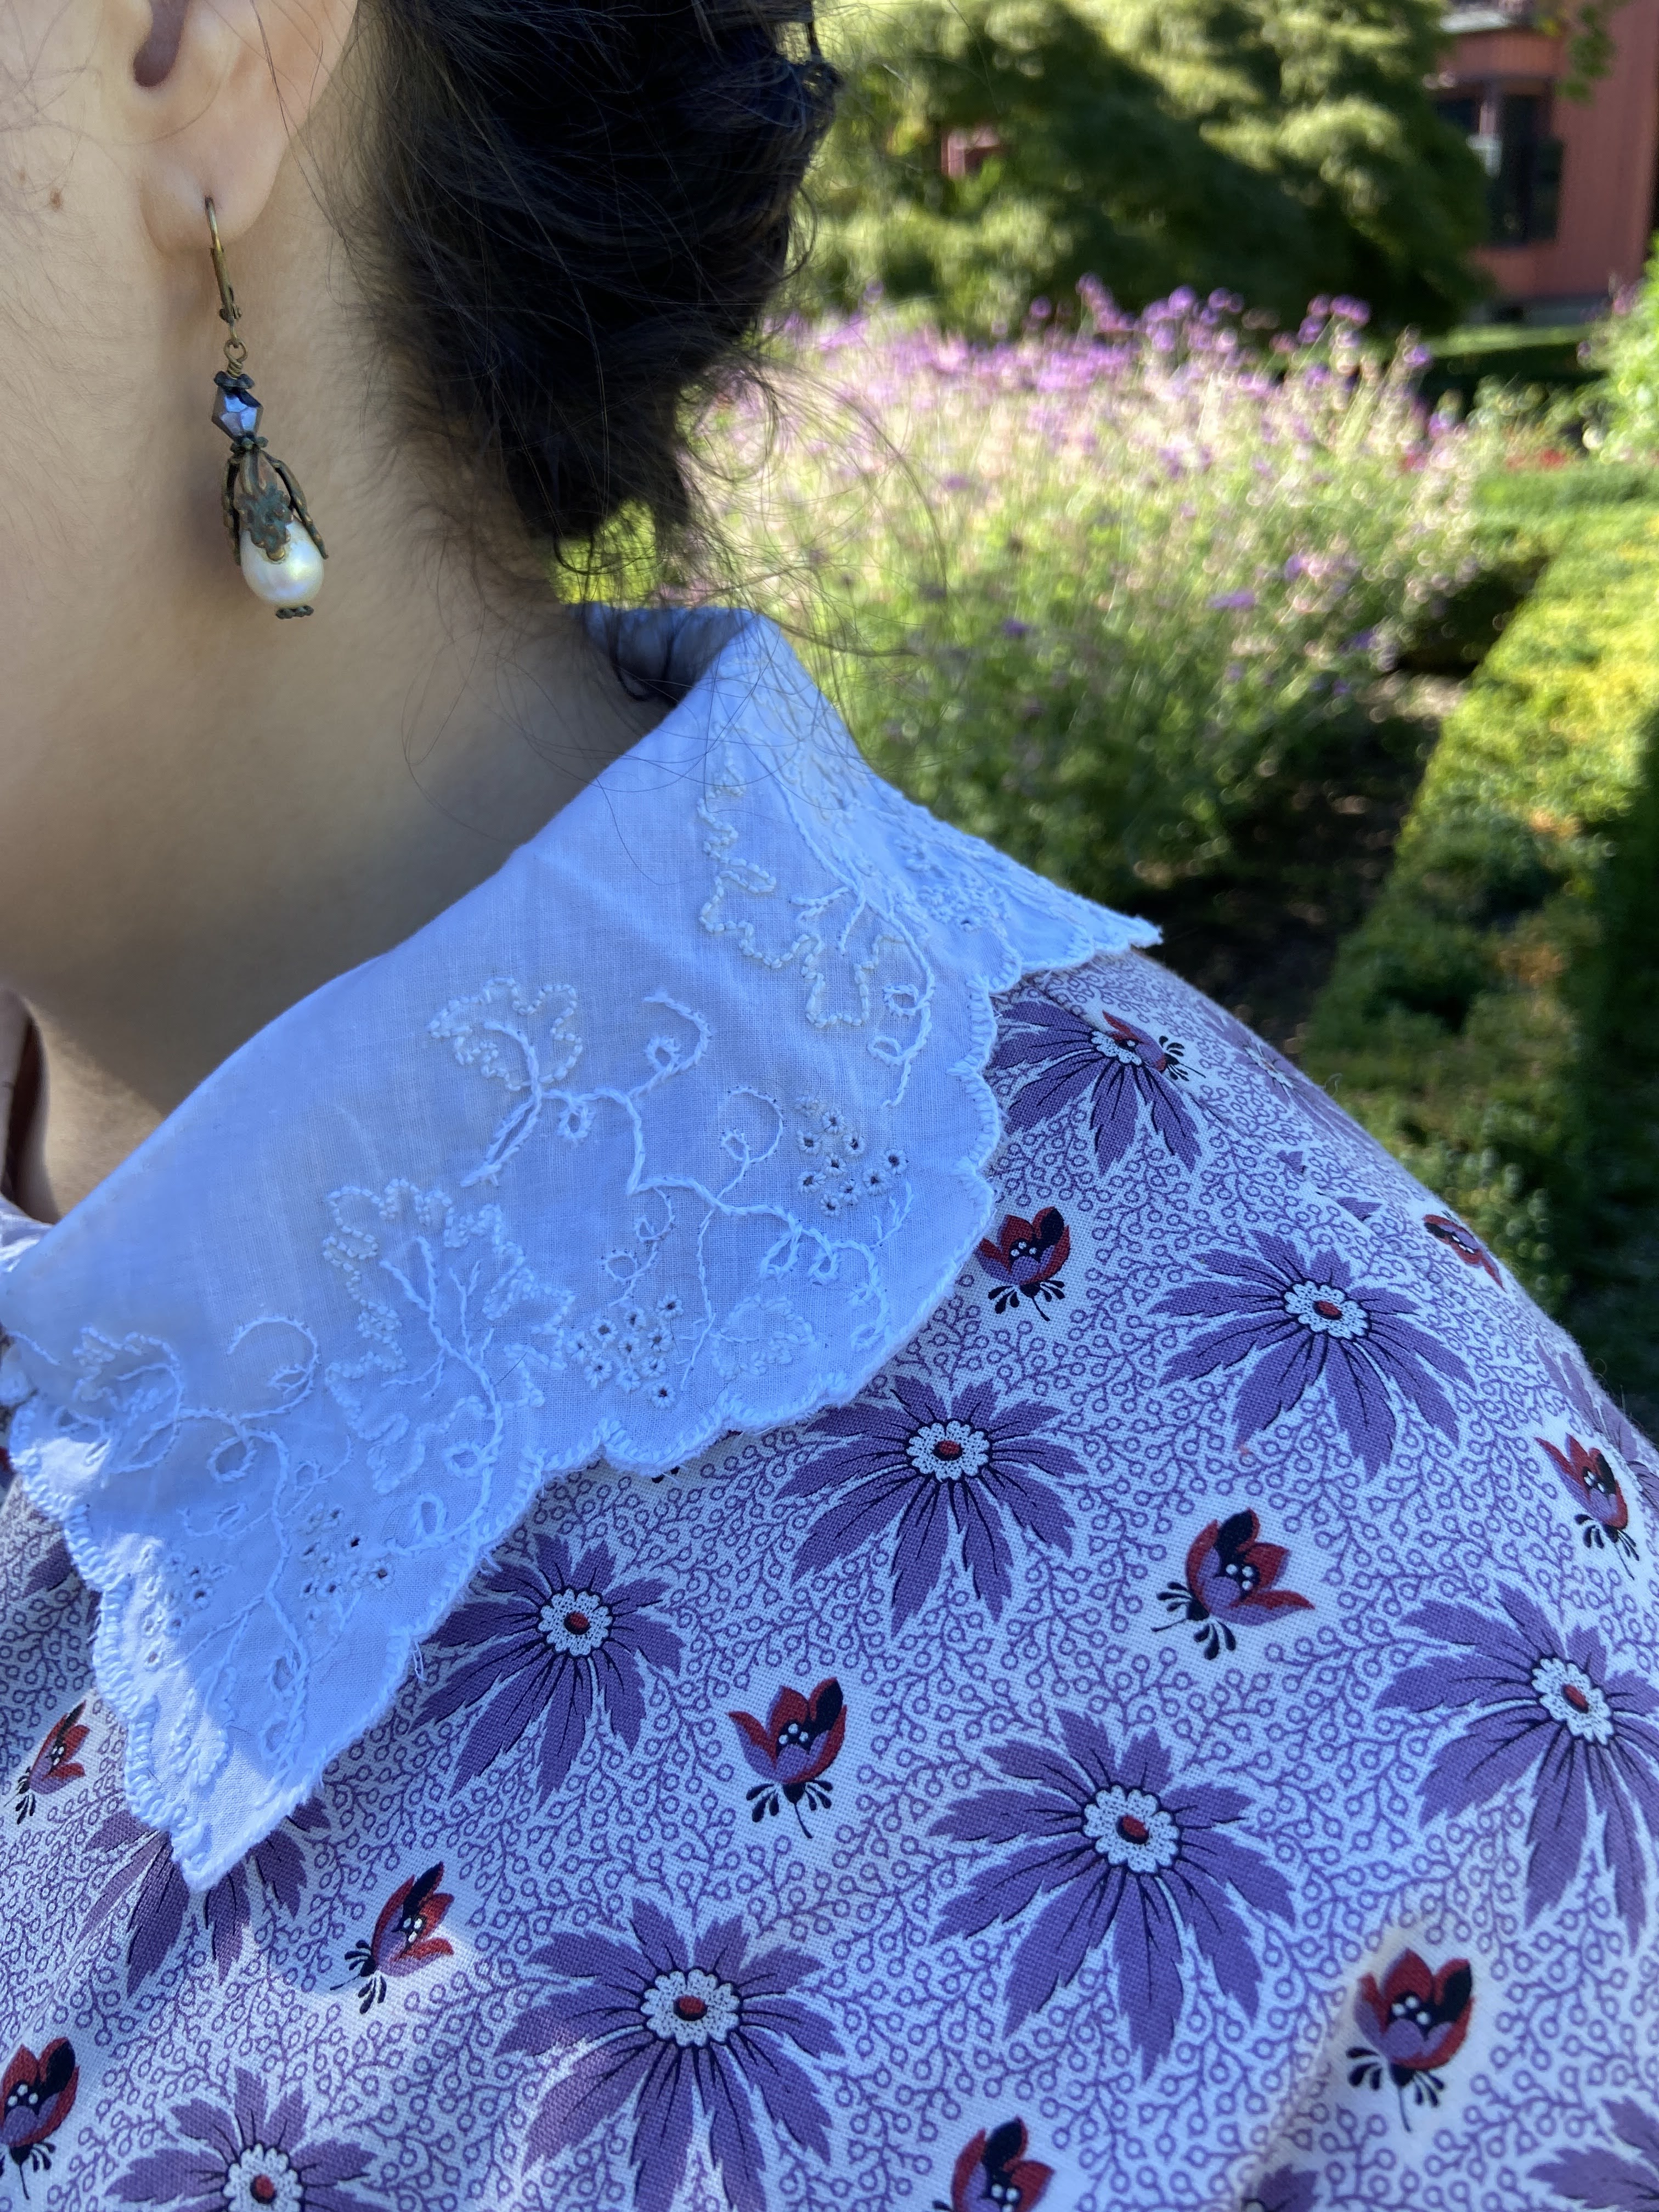
I also decided that since this project was not for an event (shocking, I know!), I was going to use it as an opportunity to focus on small details. So I made a particular effort to pattern match at the center front overlap, do something fun with the pocket (cut from scraps, so still an efficient and period use of fabric), and carry the decorative piping to the belt. Overall, I'm incredibly pleased with how it turned out!


(Please excuse the sad photos, obviously locations and materials were limited! Plus after I ironed the sheet it feel down and got wrinkled.)

The dress uses the Past Patterns 701 bodice, which has a nice full look from the gathers at the front and back. Then I altered the sleeves to be open at the bottom and stop just above my wrist, allowing my undersleeves to fill in the space below. The skirt is just rectangles finished at the front edge without closures and gathered to the waistband. The quilted silk trim is sewn on top of the bodice and skirt fronts, and finishes the neck and sleeve edges. All of the quilted strips are edged on one side with bright green silk piping.

Fiddling with button placement while I could still lay out the front pieces flat

Piping what became the top edge of the sleeve cuff
 Aside from the cotton (which admittedly was the bulk of this project), everything else came from the stash: acid green silk for the piping, quilted silk for the trim, lining, and an old "create your own buttons" kit I found in a large collection of miscellaneous buttons I was given several years ago. It was nice to use so many things that have been around for a long time!

This dress also gave me a chance to try out several new techniques, including patch pockets and hand-worked button holes. I actually really enjoyed doing the button holes, and will no longer avoid buttons on projects! The patch pocket was less intimidating but equally fun to do. It's stupidly large because I wanted to be able to carry my cell phone in it if I'm wearing this for living history programs in the future. To ensure my phone would fit I traced my phone onto a piece of pattern fabric and then measured a pocket around it that seemed reasonably sized.


Then I folded the pattern in half and added a seam allowance, so that I could cut 2 pieces to create a chevron on the pocket. Because why not?


Since I've only worn this for photos to date, I haven't needed to carry my phone around. But I know I can, and that's what matters!


The final element of this ensemble is the belt. Many of the morning dresses I looked at for inspiration had tie belts with tassels, which are very cute. I liked the idea of a belt but worried a tasseled belt would push this more into wrapper/negligee territory than I wanted. But then I found this illustration with a fun bow belt:
Period illustration, via

I decided to go in that direction and make a belt with a bow. I also piped it with the same acid green silk as the quilted trim on the dress, similar to the way the scalloped edge and lace are carried from the dress to the belt in the illustration.

I forgot to take pictures of the belt construction process, but it consists of a long belt piece, a square that becomes the bow, a small loop for the bow center, and 2 tails. The tails are sewn to the back of the loop, and then the large square and the belt are threaded into it. It makes the whole thing rather compact and gave me control over each element individually, which I think worked out well.

excuse the weird angle...bow selfie!
Since it will be a while before I can wear this out and get help with photos, I decided to entertain myself this weekend by setting up a photography studio in our bedroom. I had planned to be totally self sufficient, but after a small disaster falling off a chair, losing my carefully hung bedsheet-as-backdrop, and having the cat escape (I was trying to get her to be in photos like period cats!), Mr. Plaid stepped in and decided it would be better for everyone if I had a photographer.


Considering he has never used my camera before, and I was posing in front of a bedsheet taped to the wall, I think he did ok!


I look forward to making a fancy petticoat to wear under this in the future, but for now the simple look matched my mood. This was definitely a "make do" sort of photo shoot. But I appreciated the comfy-ness of this ensemble and the opportunity to experiment a bit with period hair without the looming deadline of a ball.


In the end, this project had somewhat ironic timing: as we're all staying home these days, it's rather appropriate to have a dress for wearing around the house. But I look forward to wearing this out in the future, for living history programs or just having friends over for brunch! In the meantime, I'll crack open a good book and continue to try to rope the cat into photos.

I hope you are all well!