I knew I wanted to live up to my role of war correspondent for the WWII Weekend in Reading, but I also didn't want to carry around a modern camera all weekend. My compromise was to use period camera, but modify it to house my modern camera.
 |
| my speed graphic with a DSLR inside--please pardon the blurry cell phone pick! My camera was occupied... |
I settled on the Speed Graphic, a large-format camera manufactured by Graphlex in Rochester, NY. The Speed Graphic was originally designed specifically for press photographers in the early 20th century, and were produced into the 1970s. The Anniversary Speed Graphic was released during the 1940s, and was the most popular press camera model used during WWII (although there were several others in use). Given its iconic nature, it was a perfect camera for me to carry at the event.
 |
| Karen Hermeston, a Canadian combat camerawoman, shooting with an Anniversary Speed Graphic |
The Speed Graphics were large format cameras; in particular the anniversary model (which from now on is what I mean when I say "speed graphic") was a 4x5 format. This means that the images were a larger size and the film was individual sheets (rather than a roll), which requires a lot of between-shots work, but gives a ton of control.
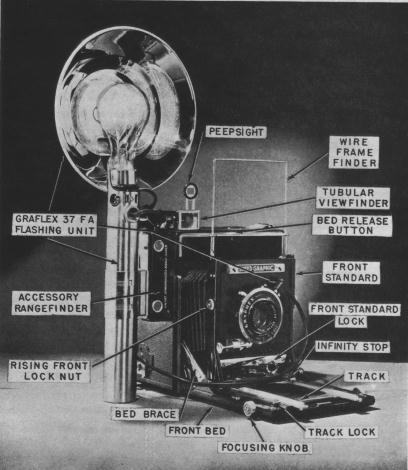 |
| anatomy of an Anniversary Speed Graphic |
As a camera for shooting action, the Speed Graphic had pretty good range: 24 shutter speeds up to 1/1000. (1/1000 is a fast shutter speed, and the faster the speed the less blurry objects in motion will look.) And while being a mostly-metal camera, it's not unmanageable in terms of weight (although it's still heavy!). In fact, I shot in about that range with my modern camera at the event.
 |
| Photographer Toni Frissell, who volunteered as a photographer for the American Red Cross holding a Speed Graphic |
The main body of the Speed Graphic is mostly bellows, with a metal track to roll the bellows in our out. The lens sits in the lens card (about a 4 inch square) at the front of the bellows, and there is an attachment at the top of the camera to see your shot. On one side of the outer body is a handle (super useful!), and the other has a flash mount. This model of Speed Graphic came with one of two backs: either a "Graphlex" or "Graphic"; mine has a "Graphic" back, which has a spring-loaded film area.
 |
| the Graphic back, opened |
I shoot with a Canon "Rebel" T3i DSLR (commonly referred to as "the baby"), which is the camera I wanted to use for the Reading WWII weekend. In order to disguise it as an Anniversary Speed Graphic, I had some configuring to do.
 |
| "the baby" |
I mentioned that the Speed Graphic is mostly bellow--this means that while the body looks roomy, it's actually filled with the bellows support framework and 4 metal bars for the back of the film area at the very back. So rather than being able to just slide my DSLR right on into the Speed Graphic body, I had to fit it to the back with the lens sticking through the bellows, and half the body hanging out the back. This meant I couldn't reattach the back flat to the camera body.
 |
| With the back removed |
 |
| After the film backing is cut away |
[
Disclaimer: almost everything I did to my Speed Graphic is reversible, but not everything. That's why I made sure to start with a no longer working camera.]
In order to hold the camera in place (without damaging anything), I used velcro strips wound through the interior bars of the Speed Graphic. That way I could remove my DSLR whenever I wanted/needed to, but it would be secure and held firmly in place while inside. To protect the body of my Canon, I layered cotton quilt batting inside the Speed Graphic (which is the fuzzy white stuff in the pictures).
 |
| Testing the view while inside the Speed Graphic |
 |
| Padded and strapped in |
Of course, this meant that I still had most of my DLSR body hanging out the back of Speed Graphic, and the whole thing looked pretty ugly.
 |
| Holding up the original camera back to where it needed to sit--there's a big DSLR-shaped gap |
To fill this gap, I decided to build an extension to the Speed Graphic body. In the end, this made the setup about 5 inches longer than the original camera...but from far away (or even fairly close) it wasn't super noticeable, and I decided that was good enough. I built the extension out of foam board (think science fair presentations) and hot glue, with two openings in the top and bottom to weave the velcro straps through. This meant that everything was attached together, and pretty solid without damaging the DSLR. I also left a small gap in the frame to thread the cord for my remote shutter (which is how I actually took pictures).
 |
| the frame |
I covered the frame in textured black scrapbooking paper before sponging it with mod poge glossy sealer. This allowed me to mimic the texture of the actual Speed Graphic body so the two looked slightly more cohesive. I attached the original back to this frame extension, and voila! I sneaky Speed Graphic "home" for my DSLR!
 |
| the finished contraption, with the DSLR viewfinder and screen through the opened Graphic back |
The one majorly inaccurate piece was that I actually shot by looking through the opened camera back, rather than through the actual Speed Graphic viewfinder. It was the best compromise I could come up with...oh well.
 |
| My inaccurate shooting form |
Putting the monster together was a little tricky, because while I strapped everything into place I needed to periodically check what was visible through the DSLR so that I could make sure the lens wasn't obstructed. (Actually, I didn't figure the process out until the second day of the event, which is why I most of my pictures from the first day didn't quite come out.) The extension also had a tendency to slide around while I was out and about, allowing the batting to poke through. Still, it was a key part of my impression for the weekend, and I had a blast shooting with it! While I want to make some adjustments, this is definitely a prop that will be coming out again.
 |
| BONUS! Someone sent me this image, found on Flikr, of me holding the baby in its Speed Graphic shell. Image from Richard Borutta |