Saturday, June 4, 2016

Triumph!

I am utterly thrilled to announce that I completed my robe a la francaise and wore it to the palace of Versailles without a single pin. Or, rather, without any pins that shouldn't have been there. Victory!

I made it, hem and all!
The gown and matching petticoat are dusky lavender silk taffeta, and trimmed with self-fabric pleated ruffles.  The stomacher is decorated with four canary-yellow bows descending in size from bust to waist. There are matching bows with four loops instead of two on the sleeves. You can see my inspiration for the arrangement in this post and on my project Pinterest board.

on the palace stair
I did not think I was going to make it--I had resigned myself to pinned-on trim before I got on the plane, but then by some miracle everything was sewn down! I did spend the day of the ball hemming, but even that was done in the nick of time. I'm still not sure how I managed it, but it was immensely satisfying to be dressed.


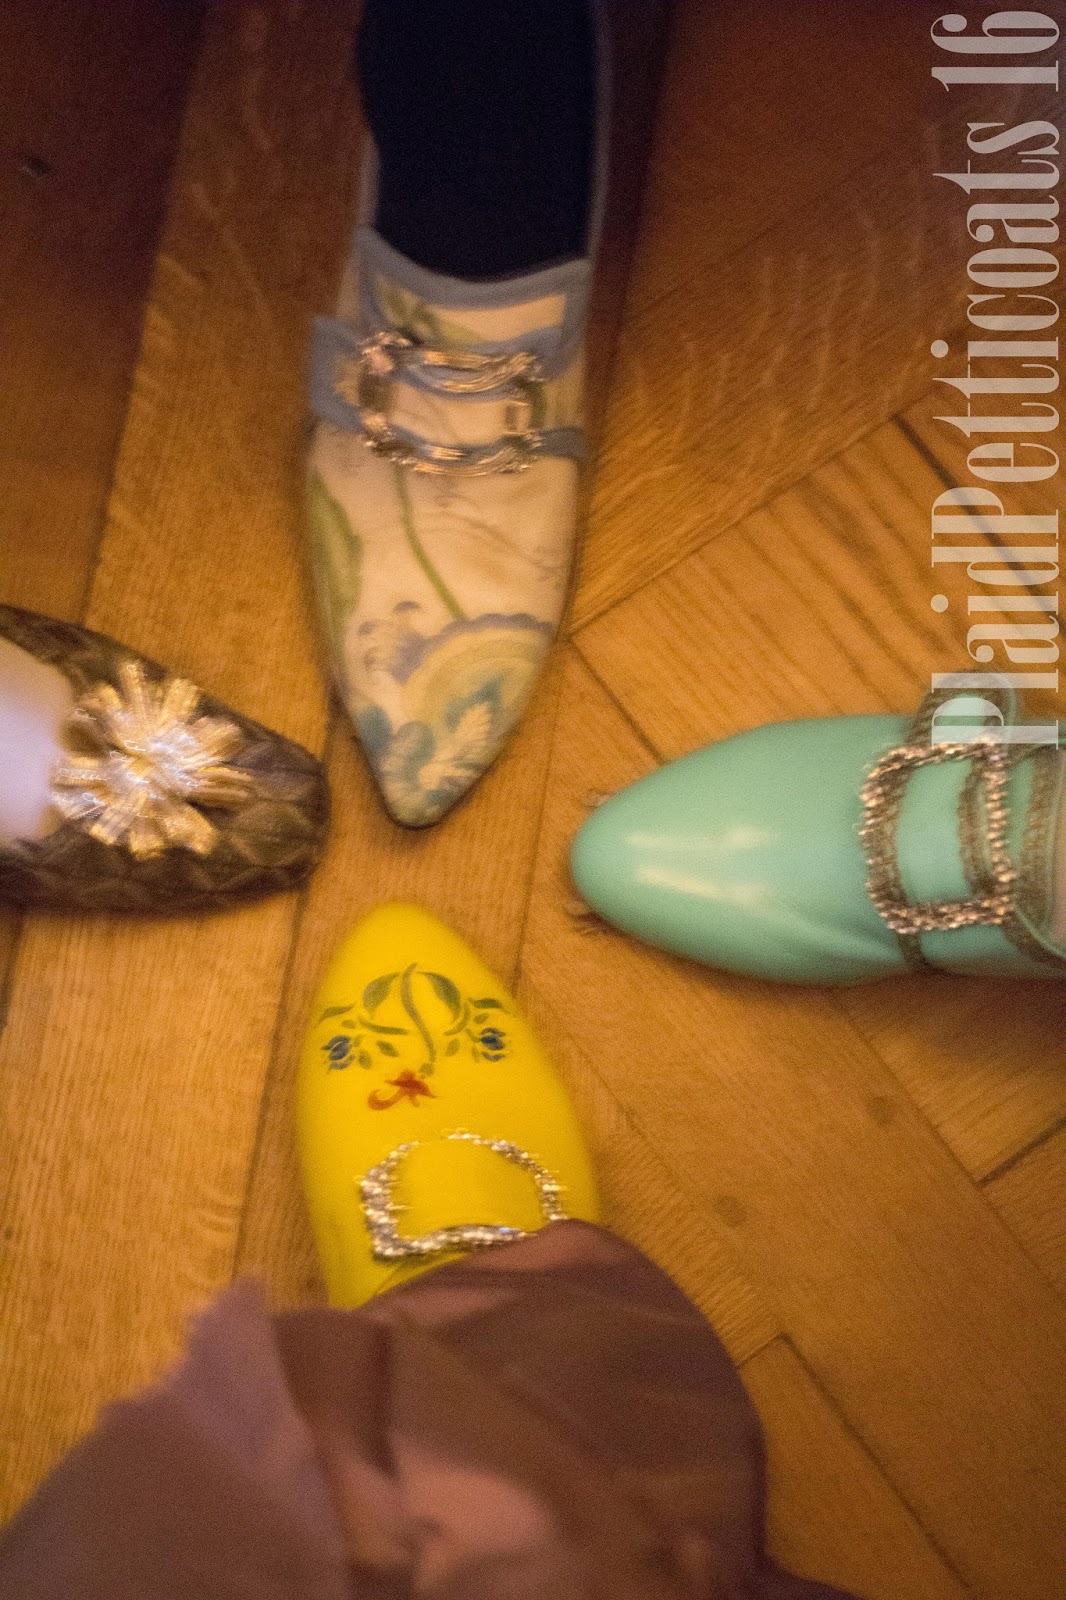
I accessorized with bling, a fan, and a quick last-minute hair accessory made out of a scrap bow and some borrowed ostrich feathers. My shoes are American Duchess kensingtons, which I painted yellow and stenciled with flowers.

shoes!
shoe shot! all pictured shoes were made/decorated by their wearer
I was unsure how everything would go together, but it really worked in the end. I suppose it would be impossible not to feel elegant at Versailles.

my fan is based on original mask fans like these, and was custom painted by Kate Dengra. She was great, you should check her out!
in the Hall of Mirrors. I swear I powdered my hair, but it's impossible to tell here!
My hair is all mine, pomaded and powdered, and brushed up over a form. After testing my hair, I decided I wanted a smaller, rounder shape...somehow I ended up making my hair bigger. Whoops. In the end I was happy with the shape, though, so it all worked out!


Of course, I ruined my karma by finishing my clothes on time, and it was pouring the day of the ball. We had a ten-minute walk from our lodging to the palace gates. Time for a creative solution! We scampered to the market, bought a roll of large trash bags, and went to work. We might have looked batty, but we were dry! I was quite pleased with my garbage bag calash--although if I look a bit rumpled in the pictures, that's why. (I'm pretty sure my panniers also slid down when I was pulling everything off, making my width a bit lower and rounder than it should have been otherwise.) So a bonus shot of us in our waterproof attire!

many thanks to Peryn for capturing this insanity!

Thursday, May 26, 2016

#TBT: My First Francaise Attempt

If you've been here before, you're already aware that I've been diving into my first 18th century ensemble with a low-key, no deadline project to figure things out. Or, rather, we've all embraced the crazy and I'm building a robe a la francaise from the undergarments out for my first time at the Palace of Versailles.

I've been practicing my minuet! (still from Coppola's Marie Antoinette)
Mostly this is my first real foray into the 18th century, but I went through a serious Marie Antoinette phase in high school after watching Sophia Coppola's Marie Antoinette movie. I read both Fraser's Marie Antoinette: The Journey (the biography that inspired the movie) and Weber's Queen of Fashion, and decided to make my own. It was a bit of a mess. There are a lot of reasons why, but at the time it didn't really matter, because I was frustrated and didn't know enough to problem-solve. The dress traveled with me to college, was worn in various pieces with various safety-pin alterations, and stayed in the collection.

high school goals: Duchess Polignac (from the movie)
At the end of my sophomore year of college, I attended a Dances of Vice event with my friend themed "the enchanted menagerie." Back in the day, DoV events were much more 18th century-leaning, with massive theatrical wigs on very tall, fabulously-dressed New Yorkers...so it was the perfect time to revive the battered francaise. I made a stomacher out of a butterfly brocade remnant, and used the remaining square as a petticoat (but it was just pinned to the panniers, because I couldn't find the matching petticoat I'd originally made). All of the butterflies on the stomacher and petticoat-thing were rhinestoned, many sitting in traffic on the way to NY (don't worry, I wasn't driving!). My friend was already blogging, but I wasn't yet, and so these pictures have never seen the light of day.

my sewing may have progressed but my flair for the dramatic hasn't changed
Have a giggle at my expense (oh man, I've come a long way on a lot of fronts since then), and enjoy!

it's hard to see the rhinestones in the event pictures, but here s an in-progress snap of the stomacher

rhinestoning in traffic!


columns are always good for posing


Saturday, May 21, 2016

HSM 16 #5: A Plethora of Petticoats

I couldn't resist the alliteration.

I really don't know how to pose with such wide hips yet...
I've managed all but one of the HSM challenges so far this year, but I didn't have good pictures or enough to say to warrant a blog post. But hooray, I do for May! I've been buzzing away on undergarments for my trip to Versailles this month, including two under-petticoats (one an outer-petticoat for a future ensemble). Today I'm adding my visible outer-petticoat to the "complete" list! Hooray!

The outer petticoat is silk on the front and cotton on the back to save my expensive fabric for where it will be visible (as seen on several originals). It is constructed similarly to my two under-petticoats, following Katherine's awesome tutorial. The only difference is that this petticoat is wider (in retrospect, possibly too wide) and is trapezoidal so it narrows towards the top to remove some bulk at the waist.

petticoat under my gown in progress
This week we had a sewing and hair party, and worked on our projects for the trip. It was the first time I tried getting my hair to hilariously tall heights and powdered it. It's not quite there yet, but this was very good practice! The powder (from LBCC Historical) was much easier to use than I'd expected, so that was good. I was able to try everything on with the hair to see the scale, which was also great...it's nice to hit the point of in progress where things can go on my body.

the towel on the floor was my powdering station--it gets everywhere!
I'm entering my petticoats as my Historical Sew Monthly item for May for the theme "holes" because they have holes for pockets formed by the two pocket slits in the side seams. This was my first time making pocket slits/thinking about room for pockets, so they felt like very noticeable holes to me! (Also, as a disclaimer, the outer petticoat isn't finished in these pictures, but it has been finished since then!)

contemplating everything...
Just the facts:

The Challenge: Holes
Material: Silk (for visible front of petti #3) and cotton (for everything else)
Pattern: None, but used Katherine's tutorial (link above)
Year: 1760s
Notions: thread, twill tape for waist ties
How historically accurate is it? Partly sewn on machine (everything not visible), but all the other materials and methods are good. I'll say 80%?
Hours to complete: Many...4 episodes of RuPaul's Drag Race and two or three of Agents of Shield.
First worn: for fittings! Will be worn for an event on the 31st at Versailles
Total cost: we'll say 2 yards or so of silk at $8/yd, plus the cotton for the back and under-pettis...around $40.

Wednesday, May 11, 2016

Floral Shoes

This didn't turn out to be a good weekend for sewing, but I still wanted to accomplish something on my Versailles project. Painting my shoes was a perfect choice, because I could work on my grad school final while I waited for paint to dry. Win!

For some reason, while doing research for this project I've been really drawn to yellow shoes. I don't know why--yellow isn't a color I usually wear, and it's not an especially iconic shoe color--but yellow shoes just kept popping up. Especially yellow shoes with floral designs.


So I decided I needed a pair.

Here are some of the originals I had in mind:

embroidered shoes, 1750-1760
Embroidered silk grosgrain shoes with figured ivory silk heels, c. 1775-85.:
bronze shoes, 17755-1780 (via)
brocade shoes, 1750s (via)
yellow silk, 1730-1770 (via)

I started with a pair of American Duchess Kensingtons in ivory, which I de-glazed following the instructions on the American Duchess site. I taped off the soles, inside the latchets, and around the edge with painters tape.  

ready to go!
Then it was time to mix paints! I was really worried about getting a yellow color I liked. The yellow (I used Angelus leather paints) was very bright on its own, and I thought mixing with white would make it lighter rather than less neon-y. I ended up ordering both white and a very light gray called "bone" as potential mixers. I'm really glad I did--I ended up using both throughout the process. It took a little bit of experimenting, but I ended up getting a color I was happy with (involving yellow, bone, and white). 

SO YELLOW
Then I let it dry, and got ready to stencil! Initially, I had planned to use a stencil and a sponge applicator, but the curvy shoe surface and the thin leather paint led to a lot of bleeding, and the first flower was a mess. I got some help from my resident painting expert (who also let me steal is setup) to fix up the edges as much as I could, but it definitely wasn't going to work as a method for the rest of the shoes.

the messy stenciled flower
After some thinking and poking and fussy noises (and overnight for the paint to dry completely), I decided to try tracing the stencil onto the shoe with pencil, and then painting it by hand. This worked much better! 

one toe box complete, one penciled and ready for paint
Stenciling also felt very period appropriate to me. Stencil designs definitely existed, although not for shoes that I've found, and hand-decorating shoes led to some of the lovely embroidered examples above. 

in progress

fully painted
These were a lot of fun to paint, and a perfect "I'm too braindead to sew" project. I'm really happy with them, and I can't wait to get them on my feet!

stenciling the side


Done:
shift
panniers
under petticoats
paint shoes

Still To Do:
stays
visible petticoat
francaise gown
hair

Friday, May 6, 2016

(Under)wearable!

I have been making serious francaise progress! Or rather, I have made so much progress on everything I need to go under my francaise that I can actually start the dress itself. Exciting and terrifying!

As I've mentioned previously, I'm mixing period hand sewing techniques and machine sewing to accomplish a decently accurate ensemble in a short amount of time. I'm learning a lot, and I look forward to making more 18th century garments in the future!

First, my stays can now go onto my body and be worn, which is awesome because it means I can start making the things that need to be fit over my stays. I'm reasonably happy with the fit, and as this is my first foray into stay-making I will accept that as a win. This week I went to my friend's house so she could lace me in and help with fitting my dress lining. She also kindly took a bunch of pictures of my making ridiculous faces in my various layers, so that I could post. Pardon the grainy cell phone quality!
stays! I haven't fully cut my tabs yet, but otherwise these are in good shape (I'm also wearing the new 18th century chemise that you haven't seen yet)
Since my last stays post, I've set the lining into the stays and added eyelets. All that's left is to bind them, which I will start this weekend and continue as a handwork project whenever I'm not home and can't sew big things.

my biggest concession to modernity was to use grommets instead of hand-sewing eyelets. so much faster, which was a necessity here!

and from the back. these can probably be laced slightly tighter, but I'd just eaten my weight in mozzarella sticks so we went a little easy :)
I used The Dreamstress's excellent pannier tutorial for my pocket hoops. They were super easy and I quite like the shape! I ran out of twill tape, so these need a couple more ties (including a waistband--at the moment there's a temporary polka-dotted hairband in there that needs to come out...), but are otherwise done. I again used heavy-duty plastic zip ties for boning. I had them on hand, but also they are very lightweight which will help in packing for the flight.

I did say silly faces...
While I do really like the shape of these panniers, they are a little too practical for Versailles. So I made double under petticoats!


Both are constructed in the same manner, based on Katherine's tutorial. I was sneaky and used the selvage edge of the cotton for the bottom of each petticoat, so that I didn't have to hem anything. The white petticoat is a little narrower (about 55 inches across), while the rust-colored one is fuller.

I think I was explaining to my friend that there are pockets
This helps with the fluffiness of my silhouette in general, but is also because I plan to wear the colored petticoat as a visible/outer layer with a someday printed gown. I've had the fabric in my stash for years, but the hurdle of starting a new century kept me from every breaking it out. Now that I've jumped on board, this will actually get made!

my petticoat fabric with the stash printed cotton for a robe a l'anglaise (someday...)
So far, I'm pretty happy with everything. I've also cut and assembled my visible silk petticoat, but am waiting to pleat it onto a waistband until I attach the trim. I used a slightly different assembly method for that one, and I'm waiting with somewhat baited breath to try it on and see if that was a good idea or not.

I've also done a mockup of the dress lining, adjusted the pattern, and cut it out. Hopefully this weekend I can assemble the lining for real, and be ready to start the dress next week.

from the back
It feels like I'm both making tons of progress and none at all, ha.

Done:
shift
panniers
under petticoats

Still To Do:
stays
visible petticoat
francaise gown
paint shoes
hair

Friday, April 29, 2016

Ruffly Fluffly


For the Regency Weekend I wanted something new that was easy and quick to freshen up my wardrobe. I've always wanted a chemisette, so I decided to give it a try! Chemisettes are quite common in day looks from the period, and are often made of very fine, sheer white cotton or linen. They fill in the neckline of a gown and create a high collar--usually with rather fabulous ruffles of some variety. I found a source for reasonably priced sheer cotton lawn on Etsy, so I decided to risk it and order a yard. It turned out to be very soft and lovely! Perfect for a chemisette.

I went with a simple double row of pleating for my collar, because this was an experiment, but in future I hope to make more with more fabulous collar treatments! Here are some of my favorites:

Eliza Schaum, 1816
Lina Groger, 1815
Jacoba Vetter, c.1816
Explore Anoniem / Anonymous:
unknown, c.1810s
For my chemisette, I started with a back piece and two front pieces. Each piece was angled along the shoulder seam, and the front pieces widened in a trapezoidal shape from the shoulders out to the underbust. I attached the front pieces to the back piece and the shoulders, and finished the other edges with a narrow hem. The bottom of each piece got a narrow channel for gathering with a waist tie. I made the neck ruffles by cutting strips of the selvage edge of my fabric (like I said--easy and quick project!) and pleating them into a neck band. Then I whipped the neck band by hand to the finished neck edge of the chemisette. 

I was bad and forgot to take pictures while I was working...but here are a few of me wearing the finished  chemisette with an old white day dress at the Regency Weekend:

the front of the chemisette is just open, so that I can pin it closed (as I did here) or wear it open. Options!
 
ruffles blowing in the wind


This was a great project, because it was easy, quick, and gave me the confidence to try future experiments! I love little things like chemisettes. I feel like they really "make" the look, and they're an easy way to add to an ensemble without making a new dress. Hooray! I look forward to wearing this chemisette again, and to making more.