Showing posts with label geekery. Show all posts

Friday, May 21, 2021

A Little Photoshop Entertainment

 We went on a castle adventure, so there had to be magic.

the author in 1870s winter dress, holding a stick that has been photoshopped into a glowing wand surrounded by translucent smoke effects

In high school I took photoshop (I'm not sure if this counted as an art class, or a technology class?), and loved learning effects that let me zhoosh photos into something a little more otherworldly. I don't play with it often, but I still really enjoy photography and the editing process.

Do I really need to hone my patronus-conjuring skills? No. But adding to or drastically altering photographs pushes me to consider the composition, light, and color balance because all of those come into play. So I think it helps keep my eye sharp for future photoshoots even if they don't require magic!

Since I'm still in a non-sewing, too-drained-to-finish-that-dance-research-post transition, I thought I would share a few of my attempts. 

In addition to the patronus above, I gave myself a wand...


...and an owl.
the author standing in the open stone arch of a castle, in 1870s winter dress. An owl is flying in the background through the castle ruins


It's a different kind of creativity, but it's nice to mix it up every once in a while!


Saturday, March 7, 2020

Avada Ke-jodhpur

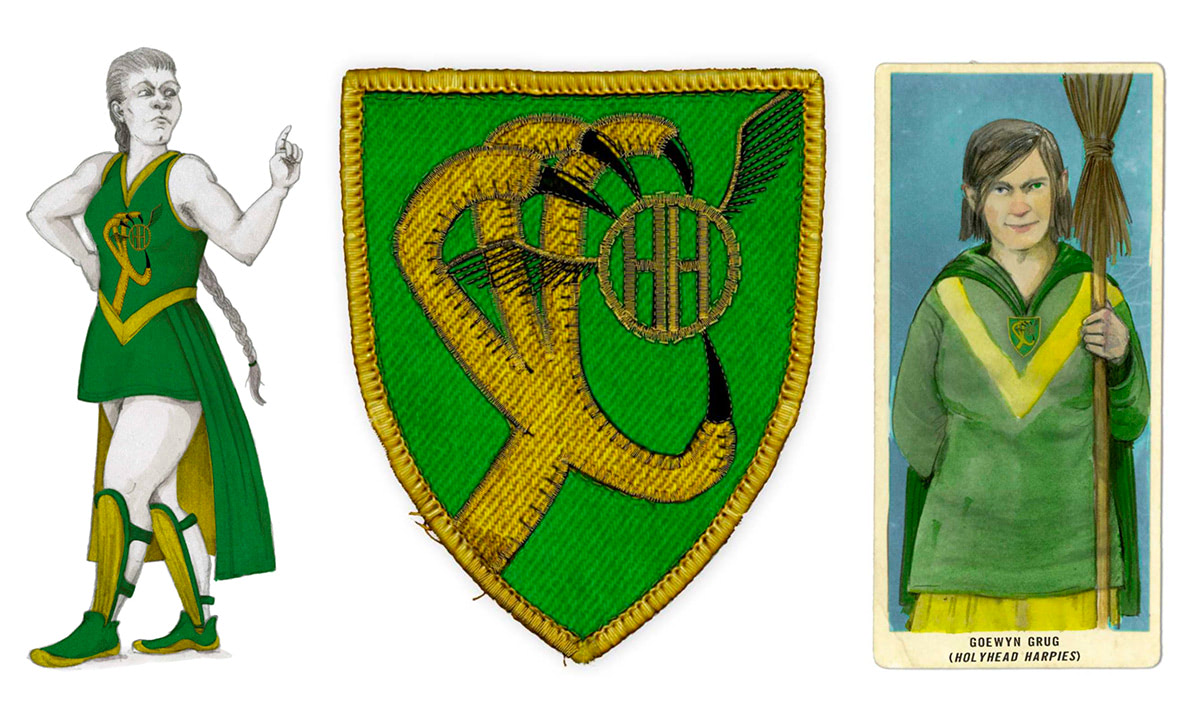
I have loved the Holyhead Harpies for a long time--which is saying something, because sports aren't typically my jam. But an all-witch quidditch team really spoke to me, and on my first trip to  WWoHP several years ago a Harpies t-shirt was the only memorabilia I brought home. I've wanted to make a Harpies outfit for Halloween/our local sci-fi convention in past years, but since sports aren't really my jam I was having trouble getting behind a set of quidditch robes. They just look so...sporty. Not to mention I'd never be able to wear them when not doing a Harry Potter Thing.

Image result for holyhead harpies
HH illustrations by Emily Gravett from the upcoming illustrated edition of Quidditch Through the Ages

But then this fall, as my annual desire to make a Harpies uniform for Halloween re-emerged, I saw a string of Instagram posts by Emily of @sewingfrankly and Lauren of @thecosplayhistorian in which they wear adorable vintage Hogwarts uniforms and Yule Ball gowns. Which inspired me to think about vintage Holyhead Harpies--much more useful, and much more me!

yes, I am generally a ham, but the look of trepidation towards the quaffle is just naturally my face when a (sports)ball is involved.
I was even able to talk a friend into embarking on this silly project with me, so there were two of us! That's practically a team, right? Another friend happened to have a green and gold 1930s dress already, so she was dubbed our coach. I'm really pleased with the way these turned out, and running around the convention with a quaffle was a lot of fun.

suffice to say: shenanigans ensued.
 Unfortunately, hotel lighting is not the best for pictures...so someday (hopefully) soon we'll do an outdoor shoot and then I can share details of the full outfit. But for today, I wanted to share a bit about my construction process of making the jodhpurs. It was...not a great process.

bubble butt, 30s style
When we decided to do vintage uniforms, I was most inspired by images like this, this, and this of early 1930s women in jodhpurs and sweaters--so that's what I set out to make. I couldn't find many patterns for vintage jodhpurs floating around the internet, but Butterick makes one (B6433) currently marketed as ideal for 20s lady detectives.

image from the Butterick pattern site of B6433. Hmmm, doesn't that ensemble look familiar? ;)
 The best thing about commercial patterns is that they tend to go on sale...and since I was shopping over Thanksgiving, I snagged both this pattern and the Simplicity retro pattern we used for the sweater for a dollar or two each. And once they arrived, I set to work!


After tracing the pattern off of the tissue, I made a mockup of the jodhpurs (without pockets) to check the fit. I ended up adding an inch to the hips, as they were a little tight on me, but otherwise things seemed fine and I moved on to cutting out my fabric: a lightweight wool houndstooth from the stash. Then I started construction--which is about when things started to go wrong.

It's been a lot of years since I used a "big 4" pattern, and I wanted to make sure I didn't cut corners. So I dutifully followed the instructions...or tried to. It turns out, the instructions were either not proofread, or everyone who tried them out ignored some bits, or they were all on a brain wavelength I was not accessing. Seriously, there were multiple steps where I either couldn't figure out what the instructions wanted at all, or after I did what the pattern described I realized that what was described was exactly backwards and I needed to do it again. UGH.

In an effort to understand what was happening, I spent a lot of time looking online for other people who had made this pattern and might have some advice to share. I couldn't find much, so I wanted to include as much detail as possible for the next person who gives this a try. (And on the flip side, if you've made this and know what I did wrong I'm happy to learn from the comments!)

So here we go!

Problem #1: The leg facing instructions end up with the wrong side out
I don't actually have a good solution to this, besides just sewing it in the other way. Each side of the ankle opening has a different facing: the self-facing and the facing.  On the self-facing side, the self-facing is basically an extra bit that is cut out as part of the pant leg, and should end up sewn wrong side to wrong side with the pant leg, so that it looks like a normal facing. This one is easy, although I am unclear why it needed to be cut as part of the pant piece and couldn't just be a normal facing.
On the facing side, the facing piece should basically hang out from the edge of the opening like a placket. When I followed the instructions, this worked...except that the wrong side of the fabric faced out. But knowing what it was supposed to be, I just ignored the instructions and sewed it the other way.

completed (corrected) facing from the inside

on the outside, this functions as a placket and goes underneath the other half of the opening (I sewed snaps on after this)


Problem #2: The front extension is never explained
After sitting with my friend and failing to figure out what the "front extension" was, I eventually was reduced to scream-crying in the kitchen while Mr. Plaid* attempted to make sense of it (no, he doesn't know anything about sewing). Eventually I thought I had it figured out--and then either I was wrong, or something about the pattern just doesn't work. Here's the pattern instruction for this step/this piece:

Notice how the extension is never shown in context of the rest of the garment? Yeah. That would have made this a lot easier! Basically where I landed is that the extension is sort of the waistband piece for the top of the back of the pocket. After attached the extension to the top of the pocket, the raw edge of the piece ends up inside the back facing when you turn under the edge of that piece and stitch it down. Unfortunately I didn't take pictures while I was doing this, but here's the piece in its final position (inside and outside). Again, this wasn't hard once I figured out what the instructions wanted me to do!

the front extension (with button hole and button) from the outside

and from the inside--notice the back waistband is folded over the raw edge of the extension before being sewn down

Problem #3: The dots don't work
The final step of construction is to sew the outside seams of the legs together from just below the knee (i.e., the top of the ankle opening) to mid-hip (i.e., the bottom of the waist opening). The pattern instructions say to match the dots on the pattern pieces and sew in between them. Except when I did this, I ended up with a front and back that were about an inch off from each other.

that super sexy pointy hip situation is a result of the fronts being longer than the backs

here's the difference when the pants are laid flat
Once more, an easy fix once I knew the problem! I ripped out the seams and re-stitched, this time matching the waists and pockets rather than the dots. Full disclosure on this one: the bottoms are a little off, so this wasn't a perfect solution. But since I never plan to wear these without boots, I'm not going to worry about it. (I think if I did want to fully fix it, I would need to re-hem the pants, correcting for the length in the hem.)

Bonus round: the pockets are also the closures
This one isn't actually a problem with the pattern, it's just really silly. The jodhpurs close with a series of buttons (mine are brown vintage Bakelite in two sizes) up the hips and at the overlapped edges of the waistband. Since this is also the location of the pockets, the pockets basically only work as pockets when the jodhpurs are fully buttoned--as soon as you unbutton them, anything inside is wont to fall out. Why??? Maybe it's period? But it seems ridiculous.

So while these jodhpurs almost killed me to make, they came out really cute in the end. I have a lot of this fabric left, so someday I'll hopefully make a matching jacket for bicycling and other "tweed" outings. But in the meantime, I look forward to further adventures on the only all-witch professional quidditch team in the league!

courtesy of Nerd Caliber

Sunday, February 17, 2019

Witch Winter

Last May when I was preparing for an adventure in Bath, I started exploring the early 1870s in depth to inspire an early bustle gown to wear to the ball. While researching I started to notice a particular color trend--especially in winter ensembles--that spoke to me.

Oh Victoriana on Instagram: “La Mode Illustree - 1871... #1870s #victorian #victorianfashion #antique #art #antiquefashion #fashion #design #artist #beautiful…”
La Mode Illustree, 1871 (via)
La Gazette Rose 1873
La Gazette Rose, 1873 (via)
1874 winter skating outfits, Ice Skating, Fashion plate
Illustrirte Frauen-Zeitung, 1874 (via)
La Toilette de Paris 1870
La Toilette de Paris, 1870 (via)
The green and gray are an elegant combination on their own, but that particular pairing has a special place in my heart as my house colors. And after seeing Emma's amazing Hufflebustle, I knew a Slytherin ensemble needed to happen. 

Image result for slytherin pride
(via)
I tried desperately to make this combination work for the Bath ball, but it turns out velvet and fur don't really work for May.


I ended up leaning into Tissot, which did speak to me for May, and for dancing, and put my house dreams on hold. But then in November I saw The Cursed Child (the Potter series sequel, written as two plays, which is currently open in New York City, London, and coming soon to several other cities), and it was back to Slytherinspiration for me!

with my house crest outside the theater


So I've thrown practicality to the wind and am putting my 1870s underpinnings to use again with a velvet and fur winter ensemble--short enough for skating, but dressy enough for future (less sporty) outings. And the timing couldn't have been better, because I've been in a rather witchy mood...and I don't mean that as a euphemism! Between Cursed Child and my other media consumption (I'm currently blazing through the second book in the All Souls Trilogy, and my sewing background show is Siempre Bruja/Always a Witch (English dub)) this winter, I'm having serious witch vibes.

I am immensely pleased with my progress on this so far, and I'm excited to share the finished version soon! In the meantime, I'll leave you with the insides...because really,  it doesn't get witchier than this.

bodice construction: you can see the gray argyll flannel lining on the pinned piece
pinning the facings: the neck and front opening are faced in textured acid green silk. I extended the bottom edge facing into a bag lining (over the cotton flannel that is flat lined with the velvet) to the waist. The flannel and velvet love to stick to each other, so the silk lets the long points of the bodice move over the skirts smoothly.

Pinning the bottom bag lining: an unintentional consequence of this approach is that the back pleats have serious body from the silk!
And with that I suppose I should get back to work so I can wear this before all the snow melts!


Thursday, January 5, 2017

A Note of Thanks

It is customary at the turn of the year to review sewing accomplishments and set goals for the upcoming year. This year, I'm not going to set any new goals because really, I just started following by 2015 goal to take my time and not skip steps of projects...and it's going well! So I'm going to work on keeping that up, rather than making new goals.

I'm also not going to do my standard month-by-month sewing review, because honestly, I didn't make that much this year. I made a few big projects well, and I'm happy with that. Instead, here is a review of my top five adventures!

5.
Gathering this fall for an 1860s weekend, I got to focus on my photography--it was a stressful Fall, but a fun interlude!

4.
The Boy came along for a summer 1920s adventure! He won't be making regular blog appearances, but sometimes it's fun to have him join me in the crazy for a bit :)

3.
I participated in the Historical Sew Monthly for the first time! I didn't actually blog about many of my entries, but it was a blast to be part of the HSM community and to see everyone's projects.

2.
My Starfleet crew is fierce, brilliant, and coming for you. I love that our crew grows every year!

1.
An adventure of palatial proportions (heh...sorry...) to Versailles--this isn't top of the list for its location, but because it was a chance to do something really insane with some of my favorite people. And to make new friends along the way!

I'm grateful for a year full of new and old friends, new and old places, and willing photography subjects. I started off 2017 with a meeting of awesome historically-minded women, and I hope that is the first of many! I hope all of you have things to make you feel optimistic about the coming year, even when the outlook is bleak. I look forward to sharing more adventures with you. Here's to a new year!


Friday, February 12, 2016

Just for Fun: How to Dance Like a Regency Zombie

It's Friday, and I have been working so much that I'm pretty sure I'm turning into an actual zombie (or at least the corporate kind).

For anyone else who's ready for a break, I wanted to share this video (made by my amazing friend, who filmed, directed, and edited) from after hours at last weekend's Regency ball.

In Pride and Prejudice and Zombies, Mr. Darcy says that any zombie could probably shuffle through a dance. Just what does he mean?

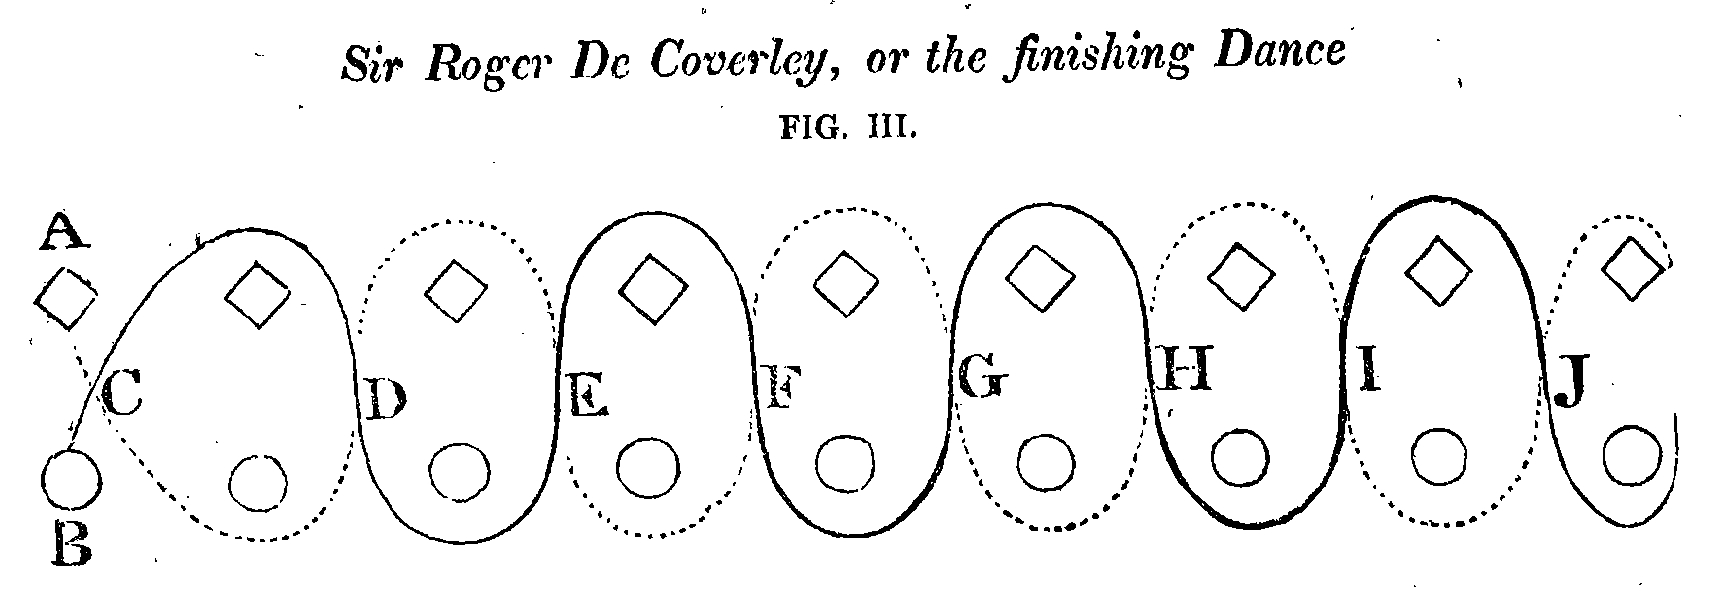
a diagram of the "shoelaces" figure in Sir Roger De Coverly, a popular dance from the period (that appears in A Christmas Carol)
Regency dancing often involved dancing through patterns within a set of couples using energetic steps. Some fellow Regency dance enthusiasts and I decided the reconstruct a particular dance* that we felt would be most fitting to zombies...


(*as you may have noticed, this is not an exact reconstruction of a period dance. It was instead choreographed by our excellent ringleader wearing white.)

Thursday, January 28, 2016

Fashion from the 23rd Century: A Tutorial

Sometimes, I need easy, cheap, and washable projects that I can wear without fear to go on adventures.

You might even say, to boldly go...

the crew, shot by Alison--thank you!!

I say, Captain!
Despite being surrounded by a bevvy of "Next Generation" lovers, I am particularly fond of Star Trek: The Original Series--it manages to be totally period and progressive at the same time, and the plotlines are utterly wackadoodle in the best ways. Not the mention the outfits! They're so very 1960s in that particular "space age" way.

from "The Man Trap", via LJ
A couple of years ago, I decided I wanted to go to work as a Starfleet officer for Halloween, so I started looking for a way to whip up an easy and inexpensive uniform. I used an XXL men's long-sleeve t-shirt as the base, and with a little experimentation was able to turn it into a decent version of the iconic "spiral"-seemed dresses the female officers wear on the show.

my first attempt
This was the perfect low-key costume--throw on a dress, add 1960s hair, makeup, and black boots and it's done!

As our favorite local convention rolled around that winter, some friends and I thought it would be fun to go out to the night events as a little Starfleet crew. Having noted all the things I wanted to fix from my Halloween attempt, I ordered another columbia blue long-sleeved shirt and the three of us made new and improved uniforms together. A year later, our crew has expanded...so I decided to promote myself to command and make another uniform.

A couple of thoughts on ST:TOS uniforms first.

LT Uhura at the control panel
Dr. Noel about to use science
The uniform went through several iterations in both style and color, but the most iconic version is the one that features a flap-front skirt, three seams in a "spiral" across the front of the dress, no waist seam, and an asymmetrical collar.

a breakdown of the uniform by season, via stattrek.com
The uniforms are also velour, so they're actually pretty thick and have a lot of body to them. I based my plans on these high-quality images of Uhura's original costume from the 1701st forum:


While my dress doesn't have that heavy drape, it does mimic the original seams without requiring all the weirdly-shaped pieces the licensed pattern uses.

If you've got an evening to kill, a buddy, and a men's long-sleeved tee, you can make a pretty fab and comfy original series uniform.

careful, these have been known to multiply...
For this mission, you will need:

1 men's long-sleeved t-shirt a couple of sizes too large (I prefer XXL) in columbia blue, goldenrod yellow, or bright red
1 black tee-shirt, either new or old (for the neck)
thread to match your shirt
an insignia patch (mine are from 8BitSpock on Etsy)
gold ric-rac (rank dependent)
sewing supplies (fabric scissors, pins, sewing machine)
(optional: if you want that smooth-torso-defined-waist-high-boob look, you'll need to wear the right foundation: a long-line bullet bra. If you plan to do so, I highly recommend fitting your dress over this!)

First, iron your shirt and turn it inside out.


Start by cutting out the neckline: locate center front, and then go a little bit to the right of that (this will be the left when it's actually on your body). This will be your lowest point. Cut out the neckline, sticking about to the seamline from the original shirt, and then create a "v" shape at your located point.


Next is the front flap: run down from the low point to the hem of the shirt. Mark that. Try the shirt on, and mark where the top of your hip is. This will be the location of your overlap. Cut up from the hem in a straight line to the top of your hip, and then over to the left a couple of inches.


Finish the right edge of your cut, then pinch the fabric above the flap until the newly finished edge overlaps with the other side (eliminating the opening). Pin closed.


Keep pinning up the front of the shirt, creating a tuck from the hem slit to the neckline.


Sew along the tuck to create a seam, leaving the bottom flap open (how much us up to you--mine is all the way open, but most of my friends' uniforms are sewn closed at least part of the way down).

seam #1 on the "right" side
Next create the two spiral seams with a buddy: put on the inside-out shirt, and have your friend create a tuck running along your right side from neck to armpit. This doesn't need to use much fabric. (I took pictures flat to get a better view, but trust me this is much easier to do on the wearer!)


Next, repeat this process to create the long diagonal seam the runs from the neck point to the hem. As your friend pins, have them pull out fabric from under your bust to make a more defined waist--but remember, you're only creating a seam on one side, so however you pull in the fabric it needs to keep everything symmetrical. (this sounds impossible, but it does work!)


Now it's time to dart the back! The original has princess seams and a second flap, so we're going to do something similar. Have your friend create two tucks from the neck to the waist, taking out as much as you need to to create a smooth, fitted back. Extend one dart all the way to the hem as a tuck, and leave the other at the waist.


Finally, make it fit: Have your friend pin all the excess material out, from wrists to waist, tapering out towards the hem (the "skirt" should stay full). Depending on how much material you have, this can create some pretty crazy wings.


Carefully take this off (use help!), and sew each side from wrist to the end of the dart and trim off the excess. My sewing machine has a nice stitch for finishing stretchy fabric, so I used that. If you don't have that option, just leave a little more of a seam allowance attached.


Make adjustments: if you want your dress shorter, fold up and hem. If you haven't sewn your flap-front all the way closed, finish the edge of the inside piece and tack in place so it doesn't flop. Hem your sleeve edges.

Finally, attach the collar: cut a wide strip from your black t-shirt (I used an old theater shirt), and sew into a continuous piece. Attach it to the raw edge of your neckline.


Fold over and finish using your method of choice. Don't forget, this won't show evenly all the way around! There should be more visible black at the low point, and the collar should stand away from the dress slightly.


Make yourself part of the crew: sew your insignia at the neckline point at the straight vertical seam, and sew gold ric-rac to your sleeves based on the rank you've assigned yourself. (If you need help, here's a handy chart!)


via fuckyeahstartrektos


And that's it! You're done! Adding winged eyeliner, beehive-d hair, sheer black tights, and black boots will finish you off.


Just remember to set phasers to stun.

red shirt down!