Thursday, January 28, 2016

Fashion from the 23rd Century: A Tutorial

Sometimes, I need easy, cheap, and washable projects that I can wear without fear to go on adventures.

You might even say, to boldly go...

the crew, shot by Alison--thank you!!

I say, Captain!
Despite being surrounded by a bevvy of "Next Generation" lovers, I am particularly fond of Star Trek: The Original Series--it manages to be totally period and progressive at the same time, and the plotlines are utterly wackadoodle in the best ways. Not the mention the outfits! They're so very 1960s in that particular "space age" way.

from "The Man Trap", via LJ
A couple of years ago, I decided I wanted to go to work as a Starfleet officer for Halloween, so I started looking for a way to whip up an easy and inexpensive uniform. I used an XXL men's long-sleeve t-shirt as the base, and with a little experimentation was able to turn it into a decent version of the iconic "spiral"-seemed dresses the female officers wear on the show.

my first attempt
This was the perfect low-key costume--throw on a dress, add 1960s hair, makeup, and black boots and it's done!

As our favorite local convention rolled around that winter, some friends and I thought it would be fun to go out to the night events as a little Starfleet crew. Having noted all the things I wanted to fix from my Halloween attempt, I ordered another columbia blue long-sleeved shirt and the three of us made new and improved uniforms together. A year later, our crew has expanded...so I decided to promote myself to command and make another uniform.

A couple of thoughts on ST:TOS uniforms first.

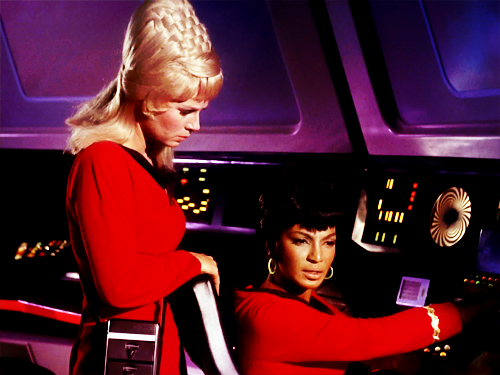
LT Uhura at the control panel
Dr. Noel about to use science
The uniform went through several iterations in both style and color, but the most iconic version is the one that features a flap-front skirt, three seams in a "spiral" across the front of the dress, no waist seam, and an asymmetrical collar.

a breakdown of the uniform by season, via stattrek.com
The uniforms are also velour, so they're actually pretty thick and have a lot of body to them. I based my plans on these high-quality images of Uhura's original costume from the 1701st forum:


While my dress doesn't have that heavy drape, it does mimic the original seams without requiring all the weirdly-shaped pieces the licensed pattern uses.

If you've got an evening to kill, a buddy, and a men's long-sleeved tee, you can make a pretty fab and comfy original series uniform.

careful, these have been known to multiply...
For this mission, you will need:

1 men's long-sleeved t-shirt a couple of sizes too large (I prefer XXL) in columbia blue, goldenrod yellow, or bright red
1 black tee-shirt, either new or old (for the neck)
thread to match your shirt
an insignia patch (mine are from 8BitSpock on Etsy)
gold ric-rac (rank dependent)
sewing supplies (fabric scissors, pins, sewing machine)
(optional: if you want that smooth-torso-defined-waist-high-boob look, you'll need to wear the right foundation: a long-line bullet bra. If you plan to do so, I highly recommend fitting your dress over this!)

First, iron your shirt and turn it inside out.


Start by cutting out the neckline: locate center front, and then go a little bit to the right of that (this will be the left when it's actually on your body). This will be your lowest point. Cut out the neckline, sticking about to the seamline from the original shirt, and then create a "v" shape at your located point.


Next is the front flap: run down from the low point to the hem of the shirt. Mark that. Try the shirt on, and mark where the top of your hip is. This will be the location of your overlap. Cut up from the hem in a straight line to the top of your hip, and then over to the left a couple of inches.


Finish the right edge of your cut, then pinch the fabric above the flap until the newly finished edge overlaps with the other side (eliminating the opening). Pin closed.


Keep pinning up the front of the shirt, creating a tuck from the hem slit to the neckline.


Sew along the tuck to create a seam, leaving the bottom flap open (how much us up to you--mine is all the way open, but most of my friends' uniforms are sewn closed at least part of the way down).

seam #1 on the "right" side
Next create the two spiral seams with a buddy: put on the inside-out shirt, and have your friend create a tuck running along your right side from neck to armpit. This doesn't need to use much fabric. (I took pictures flat to get a better view, but trust me this is much easier to do on the wearer!)


Next, repeat this process to create the long diagonal seam the runs from the neck point to the hem. As your friend pins, have them pull out fabric from under your bust to make a more defined waist--but remember, you're only creating a seam on one side, so however you pull in the fabric it needs to keep everything symmetrical. (this sounds impossible, but it does work!)


Now it's time to dart the back! The original has princess seams and a second flap, so we're going to do something similar. Have your friend create two tucks from the neck to the waist, taking out as much as you need to to create a smooth, fitted back. Extend one dart all the way to the hem as a tuck, and leave the other at the waist.


Finally, make it fit: Have your friend pin all the excess material out, from wrists to waist, tapering out towards the hem (the "skirt" should stay full). Depending on how much material you have, this can create some pretty crazy wings.


Carefully take this off (use help!), and sew each side from wrist to the end of the dart and trim off the excess. My sewing machine has a nice stitch for finishing stretchy fabric, so I used that. If you don't have that option, just leave a little more of a seam allowance attached.


Make adjustments: if you want your dress shorter, fold up and hem. If you haven't sewn your flap-front all the way closed, finish the edge of the inside piece and tack in place so it doesn't flop. Hem your sleeve edges.

Finally, attach the collar: cut a wide strip from your black t-shirt (I used an old theater shirt), and sew into a continuous piece. Attach it to the raw edge of your neckline.


Fold over and finish using your method of choice. Don't forget, this won't show evenly all the way around! There should be more visible black at the low point, and the collar should stand away from the dress slightly.


Make yourself part of the crew: sew your insignia at the neckline point at the straight vertical seam, and sew gold ric-rac to your sleeves based on the rank you've assigned yourself. (If you need help, here's a handy chart!)


via fuckyeahstartrektos


And that's it! You're done! Adding winged eyeliner, beehive-d hair, sheer black tights, and black boots will finish you off.


Just remember to set phasers to stun.

red shirt down!


Tuesday, January 19, 2016

HSM 2016 #1: Procrastination

I am the queen of procrastination. If you've been reading for a while, you may have noted mentions of sewing all-nighters, last-minute car-finishing, and general shenanigans in the "being done on time" department...so this challenge seemed perfect!

I decided to approach it as a double-whammy: when I made this 1890s ballgown the first time last January, I ended up rushing to have it wearable for the ball. In fact, I described it as the "murphy's law" of sewing plans! So even though I wore it to a ball, it wasn't actually completed--no hem, massive fit issues in the bodice, and no closures (a feature I am rather notorious for, unfortunately). So instead of storing it with my costumes, back into the UFO (unfinished object) pile it went...where it sat for a full year until this January, when with another ball approaching I needed to finish the job.

And I did!

this is the haughty expression of TRIUMPH
The Facts:
The Challenge: Procrastination
Material: many yards of royal blue poly velvet (dress), linen (lining)
Pattern: self-drafted but based on TV416 which I had recently fit (bodice), LM101 (skirt) altered to fit smoothly over the hips without darts
Year: 1890-1895
Notions: thread, rabbit fur trim, hook and eye tape
How historically accurate is it? Using Leimomi's litmus test of whether it would be recognizable in its own time, I'll say 70%. Obviously poly velvet isn't period (although silk velvet for ballgowns is), but fur trim is accurate, as are the general silhouette (hooray two petticoats!) and construction techniques. Plus, I wore it to a ball and danced in it--a very period accurate activity--and it moved comfortably through dances from the period, which I think is a pretty good litmus test as well.
Hours to complete: Oi vey. probably 4-6 hours to add closures, alter the bodice, and hem. Can't remember how long the original project took.
First worn: Fully completed, first worn to the Ball at the Winter Palace on January 9th.
Total cost: I believe approximately $50, although $10-20 of that was on rabbit fur trim, and most of that hasn't hit the dress yet. So in its current state, about $35.


with my white (faux)fur cape, an old but very useful item from 2011

on the balcony overlooking the ballroom

telling secrets and causing trouble!

a jolly party
Hooray for finishing UFOs!

Tuesday, January 12, 2016

Moving Forward to Go Backward: On to 2016 and the 18th Century!


Now is the time when I would typically write a "year in review" post, but with grad school and my crazy life I didn't actually make many projects this year. I'm ok with that, though--because when I did sew, I was able to update/improve some outfits I really love, get outside of my comfort zone, and make some really ridiculous projects--some of which I haven't even managed to blog yet!


I was also lucky to do my first photo shoot (as the photographer), get some good practice in with my petzval plates, put my 1940s Graphlex mod through its paces, and take some portraits I'm really proud of.

So as I start to plan for 2016, I'm feeling grateful for skill-expanding craft lessons, wonderful adventures, and fabulous friends.

Salem in the snow during our record-breaking winter

a deserted corner of a very cool speakeasy in Las Vegas

the town square of Tartu, Estonia, shot through a life-sized National Geographic frame as part of a national tourism project  
sunset on the National Mall, from a trip to DC in April

being silly, because we are great at that!
playing roulette at our Casino Royale party
in Star Trek (original series) uniforms
And I've got quite a year to look forward to!

In particular, my fabulous friends and I are heading off to France this spring to attend an 18th century ball at the Palace of Versailles. I'm immensely excited, but also feeling nervous about sewing a new period with such high stakes. So with a few exceptions as things come up, I'll be spending the next five months making a robe a la francaise from the inside out, starting with a chemise and stays! (Don't worry--I'll still sneak in your regularly scheduled programming of tartan history, event photos, and other research.)

I've started a Pinterest board for the project, which includes inspiration for clothing and accessories. Naturally, some of my favorites are plaid...

silk plaid robe a la francaise, 1760-90 (Met)
c.1765 (LACMA)

 c.1765 (Whitaker)
c.1752 (Mussee Mode)
...but my francaise will be a lovely dusky purple silk taffeta. Mostly because I got a really great deal on fabric, but also a little bit because no matter how much historical clothing research I do, there will still always be a part of me that is totally in love with the Sofia Coppola's candy-colored Marie Antoinette movie.


Actually, after reading Caroline Weber's biography Queen of Fashion, and watching this movie, I attempted a robe a la francaise in high school. I used the very costumey Simplicty pattern, and it was a huge mess...but I've never lost my appreciation for how incredibly elegant they are. So with several years of sewing under my belt, a lot more research, and some helpful friends, I'm heading back to the 18th century.

purple robe a la francaise, c.1775, Colonial Williamsburg (via)

And to help keep myself on task (and take advantage of a wealth of knowledge), I'm also jumping into the Historical Sew Monthly for 2016. I probably won't have something complete for every challenge, but I think it will help me stay motivated. So here's to a new year!