I have an ongoing fascination with caps. I think they're absurd. Also, I kind of love them?
Usually my focus is on Regency caps, because the only reliable daytime event I go to these days is the tea at our annual Regency dance weekend. But every now and then I come across a later period cap, and I tuck it away. While I was working on my 1860s morning dress, I came across a particular description for a breakfast cap that seemed serendipitous:
"NOVELTIES FOR DECEMBER...Breakfast-cap for a bride (a fashion becoming more and more universal since breakfast caps are now made extremely piquant and becoming). Material spotted thulle [sic], trimmed with roses and rose de chine ribbon."
I think a combination of being newly married myself and finding spotted tulle while at the craft store for something wholly unrelated lead me to decide that I needed a breakfast cap to go with my morning dress. I ended up taking inspiration from the description above and the general shape of these two extant caps from the period.
And then I made it up. I knew I needed a structure of some kind, so I ended up using black velvet ribbon to make a base shape. Then a gathered a circle of spotted tulle to the ribbon, and trimmed the hell out of it.
Ribbon base
completed cap
I did depart from the description on the colors: mine is trimmed in blue silk ribbon and purple flowers rather than roses and pink ribbon, but both the ribbons and flowers came to my stash from wedding gifts. So I feel like that doubles down a bit on the "bride"-iness of the cap and it makes me happy!
cap, hair, and dress
In the end, I should have pinned this in a bit better. It slid back from the center of my scalp where I had intended it to sit. Also, by the time this picture was taken my loosely styled hair was falling pretty considerably. But even so, I'm really pleased with this first foray into caps! It's absurd, which is just the way I like it.
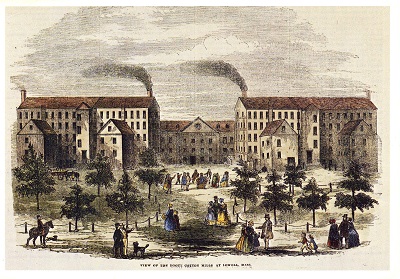
Back in December, I bought two lovely reproduction print cottons on a Little Women movie high. Printed cotton always feels very appropriate to me for New England, as between 1810 and about 1840 the Massachusetts textile industry was one of the largest in the country (and is where the power loom was invented). The Waltham-Lowell system of fabric production introduced two major ideas to fabric production: 1) going from raw material to a finished product (fabric) with all processes happening within the same factory building, cutting down on transportation and logistics; and 2) primarily employing single young women. These factors helped to shape the production of cloth in America for much of the early 19th century, and helped give the group of mill owning families known as "the Boston Associates" significant financial clout. The textile industry shaped the state as I know it today: 45 mill towns were established in MA in the first half of the century, and the mill owners also invested in the establishment of railroads and water power sites.
period illustration of a mill campus in Lowell, MA
Of course, during the 1860s new cotton fabric would be difficult to come by--the economies of the North and South were closely linked through cotton textile production, and so the Confederacy placed an embargo on raw cotton. With a lack of raw materials or employees (as many mill workers, known as "mill girls," volunteered as nurses or went home to fill in for men who had joined the army), many mills shut down until after the war. But there are so many mid-century cotton dresses, I think the association has stuck for me.
Boott Mills, Lowell (now apartments)
But you came here for the clothes! So back to that fabric order...I ordered 2 prints, one dated c. 1860 and the other dated 1830-1845. The 1860 print seemed perfect of a very particular impression-inspired dress, but I had didn't really have a vision for the earlier print. I just really liked it when I saw it on the store website. Xena approved as well.
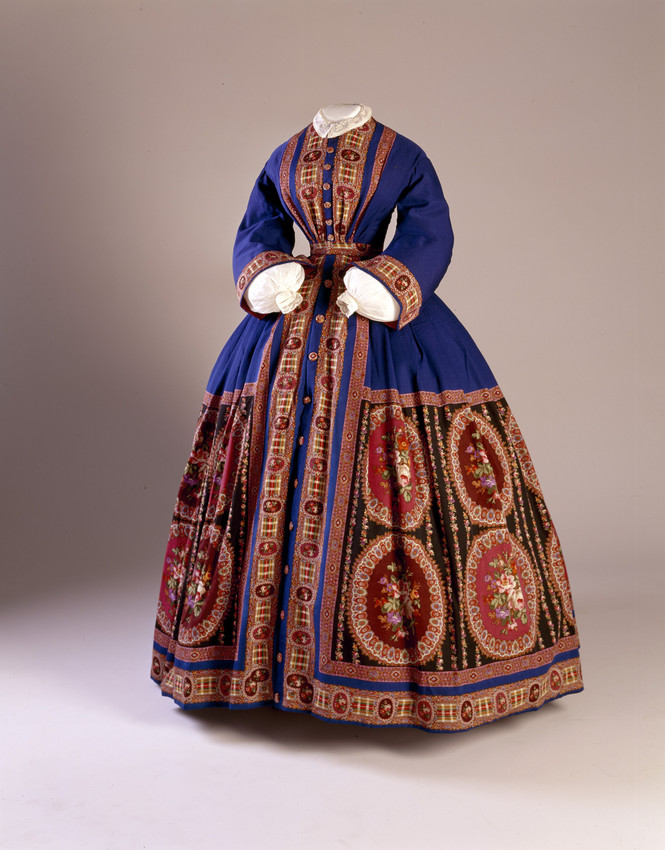
At some point over the next few months while I was busy with other projects, this fabric started to tell me that it wanted to be a morning dress. I spent some time looking at extant morning dresses and fashion plates, and started to get some ideas--specifically, many of the originals I liked were trimmed with quilted silk, and I happened to have some in the stash!
The term "morning dress" referred to relatively simple dresses that closed in front, and were intended for wear around the house. Several styles appear in magazines, including a sack coat and matching skirt, a fitted dress with no waist seam, and a dress belted to define the waist (with or without an actual waist seam separating the bodice and skirt). Two notes I found interesting while looking at issues of Peterson's and Godey's Lady's Book for this project were that morning dresses intended for interior wear (as opposed to walking dresses or morning walking dresses) were noted as often trimmed with velvet, embroidery, or quilted silk; and that apparently in France morning petticoats were more expensive than morning dresses, because they were so finely trimmed or embroidered. This actually makes sense, as many morning dresses are open in front, revealing the petticoat.
Morning dress, 1863, with embroidered, tucked, and ruffled petticoat visible in front (fromPeterson's Magazine)
Printed wool morning robe with quilted silk trim and patch pockets, 1860s (Augusta Auctions)
You can see my Pinterest board for this project here, but in general here were the elements I decided I wanted to incorporate:
-button up bodice
-full sleeves with cuffs that open to undersleeves
-quilted silk trim
-a patch pocket
-a belt with a bow
I also decided that since this project was not for an event (shocking, I know!), I was going to use it as an opportunity to focus on small details. So I made a particular effort to pattern match at the center front overlap, do something fun with the pocket (cut from scraps, so still an efficient and period use of fabric), and carry the decorative piping to the belt. Overall, I'm incredibly pleased with how it turned out!
(Please excuse the sad photos, obviously locations and materials were limited! Plus after I ironed the sheet it feel down and got wrinkled.)
The dress uses the Past Patterns 701 bodice, which has a nice full look from the gathers at the front and back. Then I altered the sleeves to be open at the bottom and stop just above my wrist, allowing my undersleeves to fill in the space below. The skirt is just rectangles finished at the front edge without closures and gathered to the waistband. The quilted silk trim is sewn on top of the bodice and skirt fronts, and finishes the neck and sleeve edges. All of the quilted strips are edged on one side with bright green silk piping.
Fiddling with button placement while I could still lay out the front pieces flat
Piping what became the top edge of the sleeve cuff
Aside from the cotton (which admittedly was the bulk of this project), everything else came from the stash: acid green silk for the piping, quilted silk for the trim, lining, and an old "create your own buttons" kit I found in a large collection of miscellaneous buttons I was given several years ago. It was nice to use so many things that have been around for a long time!
This dress also gave me a chance to try out several new techniques, including patch pockets and hand-worked button holes. I actually really enjoyed doing the button holes, and will no longer avoid buttons on projects! The patch pocket was less intimidating but equally fun to do. It's stupidly large because I wanted to be able to carry my cell phone in it if I'm wearing this for living history programs in the future. To ensure my phone would fit I traced my phone onto a piece of pattern fabric and then measured a pocket around it that seemed reasonably sized.
Then I folded the pattern in half and added a seam allowance, so that I could cut 2 pieces to create a chevron on the pocket. Because why not?
Since I've only worn this for photos to date, I haven't needed to carry my phone around. But I know I can, and that's what matters!
The final element of this ensemble is the belt. Many of the morning dresses I looked at for inspiration had tie belts with tassels, which are very cute. I liked the idea of a belt but worried a tasseled belt would push this more into wrapper/negligee territory than I wanted. But then I found this illustration with a fun bow belt:
I decided to go in that direction and make a belt with a bow. I also piped it with the same acid green silk as the quilted trim on the dress, similar to the way the scalloped edge and lace are carried from the dress to the belt in the illustration.
I forgot to take pictures of the belt construction process, but it consists of a long belt piece, a square that becomes the bow, a small loop for the bow center, and 2 tails. The tails are sewn to the back of the loop, and then the large square and the belt are threaded into it. It makes the whole thing rather compact and gave me control over each element individually, which I think worked out well.
excuse the weird angle...bow selfie!
Since it will be a while before I can wear this out and get help with photos, I decided to entertain myself this weekend by setting up a photography studio in our bedroom. I had planned to be totally self sufficient, but after a small disaster falling off a chair, losing my carefully hung bedsheet-as-backdrop, and having the cat escape (I was trying to get her to be in photos likeperiodcats!), Mr. Plaid stepped in and decided it would be better for everyone if I had a photographer.
Considering he has never used my camera before, and I was posing in front of a bedsheet taped to the wall, I think he did ok!
I look forward to making a fancy petticoat to wear under this in the future, but for now the simple look matched my mood. This was definitely a "make do" sort of photo shoot. But I appreciated the comfy-ness of this ensemble and the opportunity to experiment a bit with period hair without the looming deadline of a ball.
In the end, this project had somewhat ironic timing: as we're all staying home these days, it's rather appropriate to have a dress for wearing around the house. But I look forward to wearing this out in the future, for living history programs or just having friends over for brunch! In the meantime, I'll crack open a good book and continue to try to rope the cat into photos.
I have loved the Holyhead Harpies for a long time--which is saying something, because sports aren't typically my jam. But an all-witch quidditch team really spoke to me, and on my first trip to WWoHP several years ago a Harpies t-shirt was the only memorabilia I brought home. I've wanted to make a Harpies outfit for Halloween/our local sci-fi convention in past years, but since sports aren't really my jam I was having trouble getting behind a set of quidditch robes. They just look so...sporty. Not to mention I'd never be able to wear them when not doing a Harry Potter Thing.
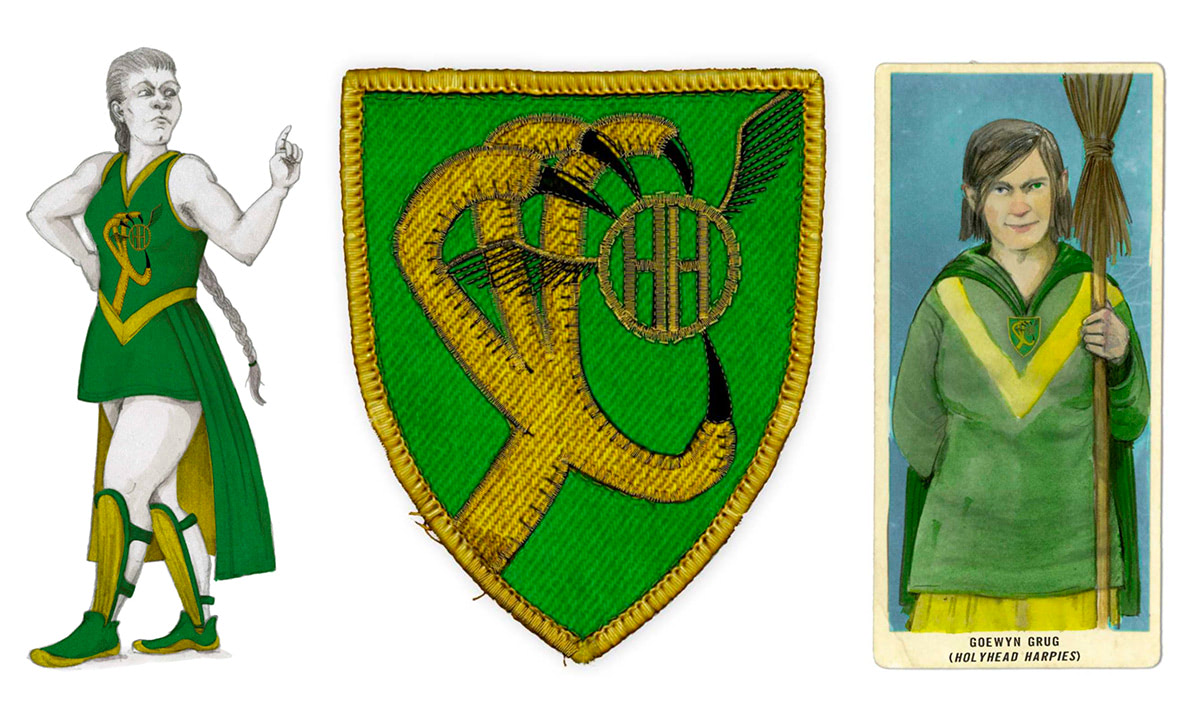
HH illustrations by Emily Gravett from the upcoming illustrated edition of Quidditch Through the Ages
But then this fall, as my annual desire to make a Harpies uniform for Halloween re-emerged, I saw a string of Instagram posts by Emily of @sewingfrankly and Lauren of @thecosplayhistorian in which they wear adorable vintage Hogwarts uniforms and Yule Ball gowns. Which inspired me to think about vintage Holyhead Harpies--much more useful, and much more me!
yes, I am generally a ham, but the look of trepidation towards the quaffle is just naturally my face when a (sports)ball is involved.
I was even able to talk a friend into embarking on this silly project with me, so there were two of us! That's practically a team, right? Another friend happened to have a green and gold 1930s dress already, so she was dubbed our coach. I'm really pleased with the way these turned out, and running around the convention with a quaffle was a lot of fun.
suffice to say: shenanigans ensued.
Unfortunately, hotel lighting is not the best for pictures...so someday (hopefully) soon we'll do an outdoor shoot and then I can share details of the full outfit. But for today, I wanted to share a bit about my construction process of making the jodhpurs. It was...not a great process.
bubble butt, 30s style
When we decided to do vintage uniforms, I was most inspired by images like this, this, and this of early 1930s women in jodhpurs and sweaters--so that's what I set out to make. I couldn't find many patterns for vintage jodhpurs floating around the internet, but Butterick makes one (B6433) currently marketed as ideal for 20s lady detectives.
image from the Butterick pattern site of B6433. Hmmm, doesn't that ensemble look familiar? ;)
The best thing about commercial patterns is that they tend to go on sale...and since I was shopping over Thanksgiving, I snagged both this pattern and the Simplicity retro pattern we used for the sweater for a dollar or two each. And once they arrived, I set to work!
After tracing the pattern off of the tissue, I made a mockup of the jodhpurs (without pockets) to check the fit. I ended up adding an inch to the hips, as they were a little tight on me, but otherwise things seemed fine and I moved on to cutting out my fabric: a lightweight wool houndstooth from the stash. Then I started construction--which is about when things started to go wrong.
It's been a lot of years since I used a "big 4" pattern, and I wanted to make sure I didn't cut corners. So I dutifully followed the instructions...or tried to. It turns out, the instructions were either not proofread, or everyone who tried them out ignored some bits, or they were all on a brain wavelength I was not accessing. Seriously, there were multiple steps where I either couldn't figure out what the instructions wanted at all, or after I did what the pattern described I realized that what was described was exactly backwards and I needed to do it again. UGH.
In an effort to understand what was happening, I spent a lot of time looking online for other people who had made this pattern and might have some advice to share. I couldn't find much, so I wanted to include as much detail as possible for the next person who gives this a try. (And on the flip side, if you've made this and know what I did wrong I'm happy to learn from the comments!)
So here we go!
Problem #1: The leg facing instructions end up with the wrong side out
I don't actually have a good solution to this, besides just sewing it in the other way. Each side of the ankle opening has a different facing: the self-facing and the facing. On the self-facing side, the self-facing is basically an extra bit that is cut out as part of the pant leg, and should end up sewn wrong side to wrong side with the pant leg, so that it looks like a normal facing. This one is easy, although I am unclear why it needed to be cut as part of the pant piece and couldn't just be a normal facing.
On the facing side, the facing piece should basically hang out from the edge of the opening like a placket. When I followed the instructions, this worked...except that the wrong side of the fabric faced out. But knowing what it was supposed to be, I just ignored the instructions and sewed it the other way.
completed (corrected) facing from the inside
on the outside, this functions as a placket and goes underneath the other half of the opening (I sewed snaps on after this)
Problem #2: The front extension is never explained
After sitting with my friend and failing to figure out what the "front extension" was, I eventually was reduced to scream-crying in the kitchen while Mr. Plaid* attempted to make sense of it (no, he doesn't know anything about sewing). Eventually I thought I had it figured out--and then either I was wrong, or something about the pattern just doesn't work. Here's the pattern instruction for this step/this piece:
Notice how the extension is never shown in context of the rest of the garment? Yeah. That would have made this a lot easier! Basically where I landed is that the extension is sort of the waistband piece for the top of the back of the pocket. After attached the extension to the top of the pocket, the raw edge of the piece ends up inside the back facing when you turn under the edge of that piece and stitch it down. Unfortunately I didn't take pictures while I was doing this, but here's the piece in its final position (inside and outside). Again, this wasn't hard once I figured out what the instructions wanted me to do!
the front extension (with button hole and button) from the outside
and from the inside--notice the back waistband is folded over the raw edge of the extension before being sewn down
Problem #3: The dots don't work
The final step of construction is to sew the outside seams of the legs together from just below the knee (i.e., the top of the ankle opening) to mid-hip (i.e., the bottom of the waist opening). The pattern instructions say to match the dots on the pattern pieces and sew in between them. Except when I did this, I ended up with a front and back that were about an inch off from each other.
that super sexy pointy hip situation is a result of the fronts being longer than the backs
here's the difference when the pants are laid flat
Once more, an easy fix once I knew the problem! I ripped out the seams and re-stitched, this time matching the waists and pockets rather than the dots. Full disclosure on this one: the bottoms are a little off, so this wasn't a perfect solution. But since I never plan to wear these without boots, I'm not going to worry about it. (I think if I did want to fully fix it, I would need to re-hem the pants, correcting for the length in the hem.)
Bonus round: the pockets are also the closures
This one isn't actually a problem with the pattern, it's just really silly. The jodhpurs close with a series of buttons (mine are brown vintage Bakelite in two sizes) up the hips and at the overlapped edges of the waistband. Since this is also the location of the pockets, the pockets basically only work as pockets when the jodhpurs are fully buttoned--as soon as you unbutton them, anything inside is wont to fall out. Why??? Maybe it's period? But it seems ridiculous.
So while these jodhpurs almost killed me to make, they came out really cute in the end. I have a lot of this fabric left, so someday I'll hopefully make a matching jacket for bicycling and other "tweed" outings. But in the meantime, I look forward to further adventures on the only all-witch professional quidditch team in the league!
January is often a time of year for reflections on the past year and making plans for the year to come. January also happens to be the time I attend our local sci-fi convention, and this year that means I've already completed my first project of 2020! I'd like to take this as a sign of productive things to come.
But before I post about that, I thought I would take a look back and see how I did in 2019.
So I completed 3 whole projects. My goals for the year were:
Early 1870s winter ensemble yup!
Regency pelisse I swapped this out for a Regency ballgown, but I'm counting it.
Tartan 1860s re-makeyup!
Chemises and petticoats I ended up getting help from a friend here. So while I can't really count this as done, I am giving myself partial credit because I have updated my period undergarments so I no longer have only one chemise from 2007 ;) Bonus Round: something new for Fezziwig's next year nope.
Additionally, I wanted to blog more and focus on having accessories for all ensembles. I definitely succeeded on both counts. I posted 11 times in 2019: 4 research posts, 2 construction posts, 3 completed project posts, and 2 miscellaneous posts. That is a large improvement over 2018, when I posted 3 times total! And on the accessories front: I wore jewelry, hair ornaments/hats, and gloves with every outfit...not just the ones I blogged about.
My blog output (and sewing output) increased a lot towards the end of the year, which makes sense given the busy life events that happened. In May and June I was out of the country for work for about 6 weeks, conducting research in Japan, France, Germany, and England. And then in October I got married!
My goals for this year are:
-1920s "tweed" ensemble
-1860s day dress
-1830s dress in cotton
Bonus round: regency dress with long-sleeved chemise (so I can wear it for day and evening!)
Again, this is a small list of goals. But I can't really expect to slow down a whole lot this year (that said, not planning a wedding is already going a long way towards my mental energy for sewing), and I want to set goals I can accomplish without stressing myself to do things without enough time. And speaking of time--though it requires a lot of time, I've really enjoyed my return to research posts over the last few months. So my extra goal this year is more research-focused posts, including some food experiments!
So thanks for sticking with me, thanks for reading, and here's to an optimistic 2020 :)
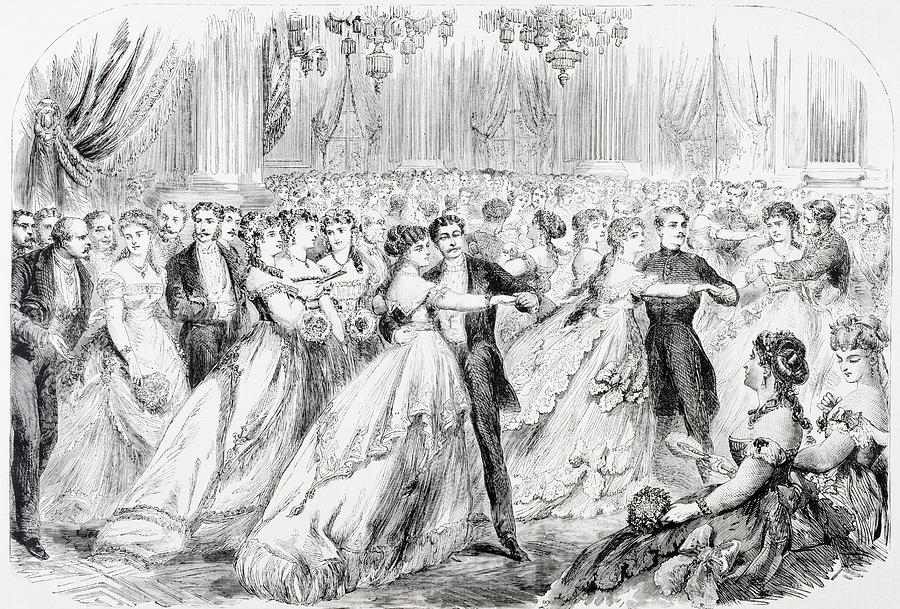
Happy holidays, readers! Today seemed like a perfect time to continue our exploration of dance in Little Women by venturing to a Christmas ball in Paris.
a society ball in Paris, 1868, from Lunivers Illustre
While abroad, the hotel where Amy and Aunt Carrol* are living is also home to several other Americans, and so the venue hosts a Christmas ball for the ex-pats. I'll let Alcott set the scene:
"she loved to dance, she felt that her foot was on her native heath in a ball-room, and enjoyed the delightful sense of power which comes when young girls first discover the new and lovely kingdom they are born to rule by virtue of beauty, youth, and womanhood. ...With the first burst of the band, Amy's color rose, her eyes began to sparkle, and her feet to tap the floor impatiently; for she danced well, and wanted Laurie to know it."
Quadrille, or Cotillon "The set in which they found themselves was composed of English, and Amy was compelled to walk decorously through a cotillon, feeling all the while as if she could dance the Tarantula with a relish."
Amy and Laurie dance the first dance of the ball together (the aforementioned cotillon) while Amy is fit to bursting to do something more complicated where she can show off (we'll come back to that "tarantula" in a bit). That description leads me to believe that the cotillon Amy finds herself in is what I would refer to as a quadrille: a dance for 4 couples which includes multiple sections, is typically performed by walking through patterns, and was immensely popular throughout the 19th century. Here's a bit of the Prince Imperial quadrille as an example--the clip begins at the start of figure 3 of the dance, and ends at about 1:04 (and a ballroom, the figure would be repeated 3 more times).
Howe explains the terminology of cotillon vs. quadrille in his 1858 manual:
"Cotillions or cotillons are of English origin, Noah Webster** spells the word both ways. The word Cotillion was derived from the English, and the word Cotillon from the French. And were first danced by four persons standing as the first four now do, in the set; two more couples were afterwards added and formed the side couples; thus the English Cotillion and the French Quadrilles are now formed precisely alike, and it is equally proper to call the dance by either name."
I am used to the term quadrille, so that's what we're going with. Let's break it down!
By the 1860s (and I think it's safe to say that Amy is in Europe between 1867-1870), a quadrille is done by 4 couples together in a square with 4 sides (so two couples face each other)-- this is called the set. Then within each set the couples are numbered 1-4, which determines the order in which you dance different figures:
quadrille arrangement diagram, from Howe (1862). The first couple is always closest to the head of the hall, typically where the band is located.
Often you dance with your partner as a couple, interacting with other couples. But sometimes you also dance as individuals: for example, ladies and gentlemen might do different things, or couples might split and dance with the person across the set from them. This second arrangement is also common, and is called "pairs":
numbered pairs for quadrilles, Howe (1862)
The two couples marked "first couple" and "second couple" are the "head couples" and dance first, and then usually whatever they do is repeated by the sides (so the same thing is done multiple times and everybody gets a turn). Here's another quadrille, called the French Quadrille or sometimes just The Quadrille. This was one of the foundational dances in this genre, and is often referenced in dance manuals (e.g., do X "as in the French quadrille"). In this performance we performed in the French style (used specifically for this quadrille), meaning we only had head couples (2 couples across from one another rather than 4), but the basic premise still stands. Notice how the couples sometimes dance together, and sometimes with their opposites:
Something else you may have noticed: quadrilles are really long! There are multiple sections*** (usually, but not always, 5) in a quadrille, with separate distinct music for each section. Each section has its own sequence of patterns (called "figures") that the couples complete. Quadrilles tend to mirror other dance trends in the particular year of the quadrille's initial creation, as well as serving as an introduction of different steps that also become popular round dances (including several of the Bavarian dances I've mentioned in previous posts). So the typical breakdown of a quadrille in the late 1860s would include mostly walking, perhaps with the addition of some waltz, polka, or other round dance. Since Amy is internally complaining about walking, I think it's safe to assume this is an all-walking quadrille like the French Quadrille and Prince Imperial Quadrille videos above.
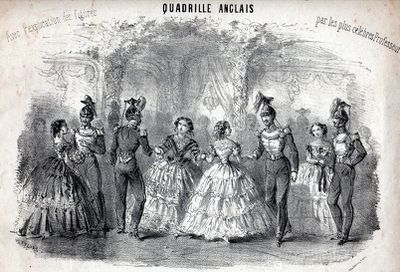
illustration of figure 3 from the Lancers Quadrille, frontispiece for quadrille music c.1860
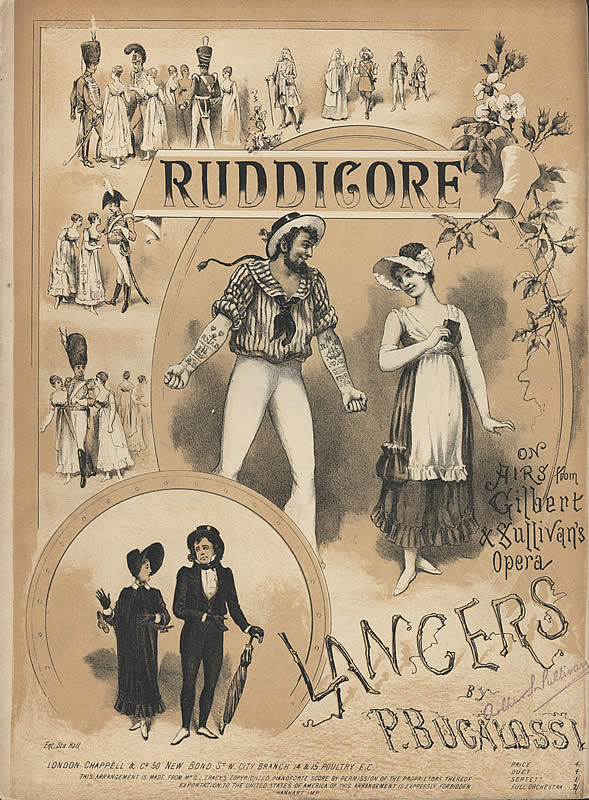
There is a language to 19th century dancing: figures get repeated over and over in many different dances. This extends to quadrilles as well, both as the same figures you might see in a contra dance appear in quadrilles, and among quadrilles themselves. There are a few quadrilles that were very popular, and many other quadrilles follow similar patterns; so you have many quadrilles that have structures echoing the French Quadrille, and others that echo Lancers (which we're going to touch on in a later post). Quadrilles also have specific music, but there were arrangements that drew on popular operas or other music of the day. In fact, there's a great Lancers quadrille arrangement of Gilbert and Sullivan's The Mikado that I've danced to, which made me smile when I realized what the music was because I was in a production of the operetta in high school.
I actually also found a clip from the ball, and you can hear the arrangement! It goes from 6:48 to about 7:12 in the video (sharing is disabled, but you can watch it here if you're curious).
This is a Lancers arrangement of music from Ruddigore, another G&S operetta I performed in
As a final example, I have some terrible footage of a recent performance of the Prince Imperial Quadrille this September (there's a reason I'm not in charge of videography!). The reason I'm including it is to show two things: one, the way quadrilles move through different figures, and two, a bit of how it looks when you dance with a complete set of 4 couples. On the latter, notice how the two active couples complete 2 figures (forward and back, ladies' chain) then all 4 couples do a figure together (march to corners). The video cuts off just as we start march to corners.
Polka-redowa(3/4)
"She showed him her ball-book with demure satisfaction when he strolled, instead of rushing, up to claim her for the next, a glorious polka-redowa." -New Impressions
Fast forwarding a bit through the evening (although Alcott's ball descriptions are incredibly colorful and this one is the best...if it's been a while, I recommend going back and re-reading this whole chapter :) ), Amy finally gets to show Laurie what she can do when they dance a polka-redowa together. Does the word "redowa" and the time signature ring any bells? We're back in waltz time, and we talked about redowa when Meg danced it in The Laurence Boy.
Polka-redowa is another dance from the Bavarian fad, and is comprised of sliding steps, cutting steps, and leaping steps. This same list of steps is used in several of the Bavarian round dances, but the prevalence of leaps in the polka-redowa makes it especially elegant to watch when done well (and very exhausting). Because it is in 3/4 time (the same time signature as plain waltz, polka mazurka, and several other dances), it's possible to swap polka-redowa in and out with other steps. This helps mitigate the energy required for all the leaping because you can show off for a bit and then take a break with something lower-impact like plain waltz.
the polka redowa illustration in Hillgrove (1863)
1860s dance manuals describe this dance as being like the polka, except not. Seriously, Howe (1862) describes the polka-redowa as:
"This dance is composed of the same step as the Polka, with the exception that you slide the first step instead of springing, and omit the pause, as in this dance you count three, both for the music and dance."
So, do a polka step, but use a slide instead of a hop on the first step, and count in 3 rather than 4. How is that the same step as the polka? sigh. Several other manuals I looked at had similar descriptions, but Hillgrove's 1863 A complete practical guide to the art of dancing (another trusty favorite) gave us a bit more. He still describes the step as being a polka step, but adds some explanation of how the changes to polka-redowa impact its form:
"This dance is precisely the same as the first three movements of the Polka, the fourth step or interval berg omitted; and is danced in three-four time...which makes a more graceful and easy dance than the Polka, and one that is a great favorite."
Here the easy grace that is noticeable in well-executed polka-redowa is highlighted.
Below is an example of polka redowa, pulled from an 1860s waltz choreographed for performance--notice that even though a hop is used to turn 180 degrees each time, it's a pretty smooth dance.
I think with this note about gracefulness in mind, polka-redowa is a perfect dance for Amy to really show her skills. It is difficult to execute well, and it requires stamina and form to make all the sliding and leaping look easy and elegant. Plus, the pointed toes that peak out when you slide your foot forward are a perfect opportunity for Amy's white satin slippers to make an appearance!
Hillgrove also notes that polka-redowa can be done in several different ways, and it's up to the gentleman to use whichever method he sees fit. This is an added challenge, because you really have to know the dance backwards and forwards!
"There is no particular rule by which the Polka Redowa should be performed. This is left to the option of the individual. It may be danced turning to the right or to the left, backward or forward; or, in cases where there is not sufficient space to proceed, the step and portion may be preserved in making a kind of balance or set."
This is also an opportunity for Laurie and Amy to connect as a couple (dancing-wise, at least!) because staying in tune with each other to switch things up is key. Practicing years ago at home would certainly have helped, and would have made it easier for the pair to dance well together than to dance as gracefully with other guests at the ball.
Tarantula, or Tarantella
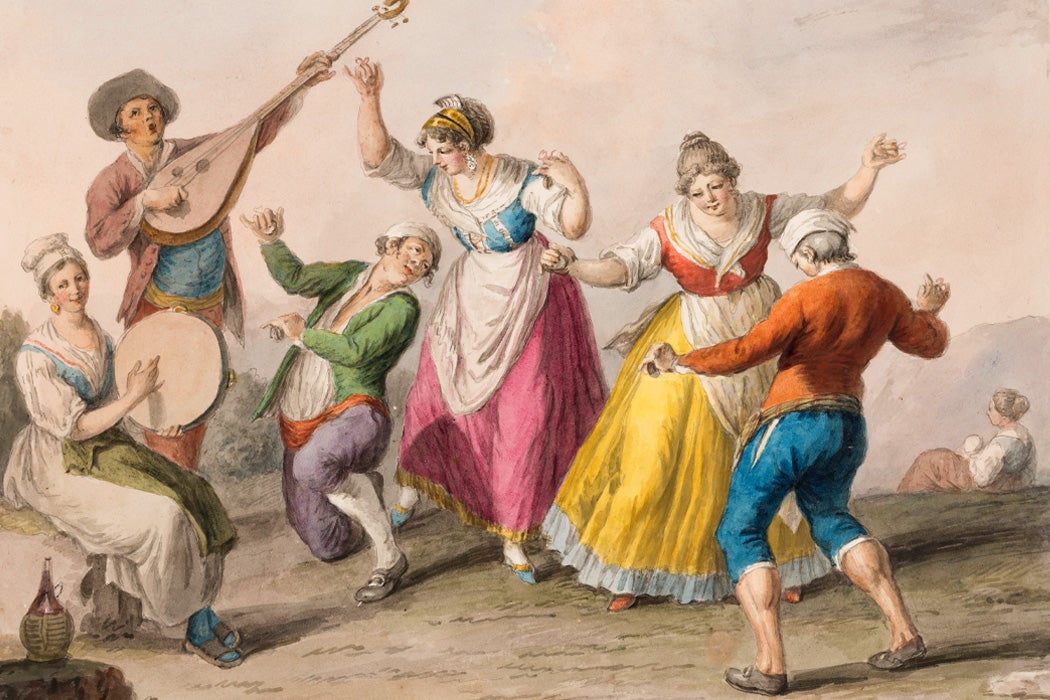
Finally, let's end with a quick note about the "tarantula" Amy would rather be dancing at the beginning of the ball. In both the Matteson (2016; p497) and Shealy (2013; p479) annotated editions of Little Women, there is a note that Amy is incorrectly using "tarantula" where she means "tarantella" (a Sicilian folk dance). I expected this to be a quick note about the presence (or lack) of tarantellas in mid-19th century Parisian ballrooms...but I actually found the word "tarantula" in multiple dance manuals, including Howe's! The best description of a tarantula I found is from The amateur's vademecum: A practical treatise on the art of dancing by E. Reilley, published in Philadelphia in 1870:
"But no dance has so singular a history respecting its origin as the national dance of the Neapolitans, called the Tarantula...Love and pleasure are conspicuous throughout this dance. Each motion, each gesture, is made with the most voluptuous gracefulness. Animated by the accompanying mandolins, tamborines and castenets, the woman tries, by her rapidity and liveliness, to excite the love of her partner, who, in his turn, endeavors to charm her with his agility, elegance, and demonstrations of tenderness. The two dancers unite, separate, return, fly into each other's arms, again bound away, and in their different gestures alternately exhibit love, coquetry and inconstancy. The eye of the spectator is incessantly diverted with the variety of sentiments which they express; nor can anything be more pleasing than their picturesque groups and evolutions. Sometimes they hold each other's hands, the man kneels down, whilst the woman dances round him, then again he rises; again she starts from him, and he eagerly pursues. Thus their whole dance is but assault and defence [sic], and defeat or victory appear equally their object."
However, the plot thickens. I did find one dance manual that refers to the Italian dance as a tarantella and not a tarantula: Coulon's hand-book; containing all the last new and fashionable dances, published in London in 1866 and 1873 (expanded). Coulon writes:
"To dance the Tarantella, however, in our circles as they dance it at Naples would be impossible, and, therefore, when Madame Michau introduced it in London in 1845 she made a selection of about eight steps or figures, that have had great success among the higher classes here."
Here is where I admit that I've never done either the traditional Italian tarantella or the European ballroom version described by Coulon. Looking at his instructions, the ballroom version is a dance for individual couples (in open and closed positions), which seems pretty different from at least the modern versions of the tarantella that I've seen. Someday hopefully I'll get to try reconstructing this, and then I will add a video!
But for now, I'm not sure that using the term "tarantula" is Amy making a mistake. As it appears to be a somewhat common term for referring to the folk dance (in American sources at least), Alcott may just be using the term she's seen. Or it could be even more intentional, to differentiate the Italian folk dance from the ballroom dance "la tarantella" her readers may have seen or heard about.
tarantella or tarantula?
That's it for this week! Next up is likely a break from the dancing and a return to costuming for a bit, since I've actually been sewing. But if you're enjoying these posts, there are more to come!
Happy New Year to all!
*While Aunt March funds Amy's trip abroad, she doesn't actually go--instead, Aunt Carrol and cousin Florence are Amy's companions
**here, "Noah Webster" refers to Webster's Dictionary
***Another note on terminology: we tend to refer to each of these sections as "figures", but that's a bit confusing because the individual patterns that make up a figure are also called figures. In the dance manuals, they referred to the sections of the quadrille as numbers or by names (for example, the third section of the Prince Imperial quadrille in the video above is called "la corbeille"). I've abandoned Howe for a second in favor of The Prompter: Containing full descriptions of all the quadrilles, German cotillons, etc. by William De Garbo (New York, 1865) as his discussions of quadrille mechanics are a lot more detailed. De Garbo explains the makeup of quadrilles:
"A Quadrille is one Number of Figures. Two or more Figures constitute a Number: as in 1st No. Quadrille Francaise, “Right and Left” is a figure; “Balancé” is the next figure; “Ladies Chain” the next; and “Balancé” the last: altogether, these figures constitute a Number. Five Numbers usually constitute what is termed “a set of Quadrilles;” as the “Lancers Quadrilles,” “Caledonian Quadrilles,” “Le Prince Imperial Quadrilles,” etc. It is common to designate Numbers as Figures,— i.e ., instead of 1st No., 2d No., &c., they are sometimes called 1st Fig., 2d Fig., &c. The former definitions are preferable; the term “Numbers” according with the five Numbers or different pieces of music set to the Quadrilles. Figures accord with the strains of music." (emphasis mine.)


![1863 Godey's. "Breakfast caps. 1. ...of French muslin trimmed with violet ribbons. 2. ...in the form of a net trimmed all round with a double row of blonde; two ribbon streamers behind. Three roses make a pretty bandeau to the front of the cap. Black or white net may be used for the purpose, and whatever colored ribbon best suits the complexion of the wearer." [jrb]](https://i.pinimg.com/564x/ab/fa/01/abfa01c13ff72e5aa995a6643e446497.jpg)